Monday, May 31, 2010

Cream Cheese Bars


This is a recipe that was given to me by a neighbor. They are so easy to make but you would never guess that by the taste! I usually wouldn't even try a bar that was made with crescent rolls, however, I tried these and loved them even before knowing that there were crescent rolls in them!

Ingredients:

2 - Tubes Original Crescent Rolls
2 - 8 oz. Boxes Cream Cheese
1 Cup Sugar (divided)
1 tsp. Vanilla Extract
1 tsp. Almond Extract
1 Egg

Directions:

Preheat oven to 375 degrees.

Mix cream cheese, vanilla, almond, 3/4 cup sugar and egg yolk. Beat with mixer until creamy. Spray 9x13 pan with nonstick spray. Spread 1 tube
crescent roll evenly over bottom of pan, sealing seams with fingers. Spread mixture evenly over crescent.

Cover mixture with second tube of crescent rolls, again spreading evenly & sealing seems. Beat egg white with fork until frothy, spread evenly over top. Sprinkle remaining 1/4 cup sugar on top layer.

Bake 20 minutes.

Refrigerate at least 4 hours before serving.

Thursday, May 27, 2010

May Daring Bakers-- Piece Montée (Croquembouche)


The May 2010 Daring Bakers’ challenge was hosted by Cat of Little Miss Cupcake. Cat challenged everyone to make a piece montée, or croquembouche, based on recipes from Peter Kump’s Baking School in Manhattan and Nick Malgieri.

I failed miserably at this challenge. I'm not sure how-- the recipe itself seemed rather straight forward and simple; without any special ingredients or components. I'm not sure exactly where I went wrong, but I do know that my Pate a Choux never rose into rounded shapes. They were flat and spread out. I could tell as I was incorporating the eggs that my batter was too runny. I followed the directions exactly, but could tell as I tried to pipe it onto the parchment paper that it was never going to turn out.

Because my Pate a Choux made discs instead of nice balls, I wasn't really able to mount my piece and give it any height. So instead, I just attempted to fill them with the vanilla cream and frosted them with some chocolate ganache and had some cream puffs instead of the classic cone-shaped piece montée.

While they may not be pretty (and definitely not wedding cake-worthy), they tasted scrumptious!

The only way I was going to get any height out of my dessert was by stacking it into a glass!


If you'd like to see what the results of this challenge really were supposed to look like, check out the Daring Bakers Blogroll. If you'd like to see more of my failed attempt at this challenge, read on.
~~~~~~~~~~~~~~~~~~~~~~~~~~~~~~~~~~~~

Ingredients:
For the Vanilla Crème Patissiere (Half Batch)

1 cup whole milk
2 Tbsp. cornstarch
6 Tbsp sugar
1 large egg
2 large egg yolks
2 Tbsp. unsalted butter
1 Tsp. Vanilla

Directions:
Dissolve cornstarch in 1/4 cup of milk. Combine the remaining milk with the sugar in a saucepan; bring to boil; remove from heat.

Beat the whole egg, then the yolks into the cornstarch mixture. Pour 1/3 of boiling milk into the egg mixture, whisking constantly so that the eggs do not begin to cook.

Return the remaining milk to boil. Pour in the hot egg mixture in a stream, continuing whisking.

Continue whisking (this is important – you do not want the eggs to solidify/cook) until the cream thickens and comes to a boil. Remove from heat and beat in the butter and vanilla.

Pour cream into a stainless steel/ceramic bowl. Press plastic wrap firmly against the surface. Chill immediately and until ready to use.

Ingredients:
For the Pate a Choux (Yield: About 28)

3/4 cup water
6 Tbsp. unsalted butter
1/4 Tsp. salt
1 Tbsp. sugar
1 cup all-purpose flour
4 large eggs

For Egg Wash: 1 egg and pinch of salt

Pre-heat oven to 425◦F degrees. Line two baking sheets with parchment paper.

Combine water, butter, salt and sugar in a saucepan over medium heat. Bring to a boil and stir occasionally. At boil, remove from heat and sift in the flour, stirring to combine completely.

Return to heat and cook, stirring constantly until the batter dries slightly and begins to pull away from the sides of the pan.

Transfer to a bowl and stir with a wooden spoon 1 minute to cool slightly.

Add 1 egg. The batter will appear loose and shiny.

As you stir, the batter will become dry-looking like lightly buttered mashed potatoes.


It is at this point that you will add in the next egg. Repeat until you have incorporated all the eggs.

This is where I noticed mine to be too loose: I wonder if I should have only used 3 eggs?

Piping:
Transfer batter to a pastry bag fitted with a large open tip (I piped directly from the bag opening without a tip). Pipe choux about 1 inch-part in the baking sheets. Choux should be about 1 inch high about 1 inch wide.

Using a clean finger dipped in hot water, gently press down on any tips that have formed on the top of choux when piping. You want them to retain their ball shape, but be smoothly curved on top.

As you can see, I did not need to do this. Mine were way to runny. (Um... apparently one of my children were playing with my camera and not only set it so the time stamp shows up, but set the time stamp incorrectly! Aack!)


Brush tops with egg wash (1 egg lightly beaten with pinch of salt).

Baking:
Bake the choux at 425◦F until well-puffed and turning lightly golden in color, about 10 minutes.

Lower the temperature to 350◦F and continue baking until well-colored and dry, about 20 minutes more. Remove to a rack and cool.

Can be stored in a airtight box overnight.

Filling:
When you are ready to assemble your piece montée, using a plain pastry tip, pierce the bottom of each choux. Fill the choux with pastry cream using either the same tip or a star tip, and place on a paper-lined sheet. Choux can be refrigerated briefly at this point while you make your glaze.

I used a little metal piping tool I have to fill the pastry. Some of them were so flat, they couldn't be filled so I had to just use two of them to sandwich the vanilla cream!


Use one of the following to top your choux and assemble your piece montée:

Chocolate Glaze:
1 part heavy whipping cream
3 parts finely chopped chocolate (use the finest quality you can afford as the taste will be quite pronounced; I recommend semi-sweet)

Combine and melt chocolate in microwave or double boiler. Stir at regular intervals to avoid burning. Use the best quality chocolate you can afford. Use immediately.

Since mine was not able to be stacked like a classic piece montée, I just glazed mine with chocolate and called it a day.


Voila!


Here is the inside of one of the puffs I was able to fill:


Hard Caramel Glaze:
1 cup (225 g.) sugar
1/2 teaspoon lemon juice

Combine sugar and lemon juice in a saucepan with a metal kitchen spoon stirring until the sugar resembles wet sand.

Place on medium heat; heat without stirring until sugar starts to melt around the sides of the pan and the center begins to smoke. Begin to stir sugar. Continue heating, stirring occasionally until the sugar is a clear, amber color.

Remove from heat immediately; place bottom of pan in ice water to stop the cooking. Use immediately.

Assembly of your Piece Montée:


You may want to lay out your unfilled, unglazed choux in a practice design to get a feel for how to assemble the final dessert. For example, if making a conical shape, trace a circle (no bigger than 8 inches) on a piece of parchment to use as a pattern. Then take some of the larger choux and assemble them in the circle for the bottom layer. Practice seeing which pieces fit together best.

Once you are ready to assemble your piece montée, dip the top of each choux in your glaze (careful it may be still hot!), and start assembling on your cake board/plate/sheet.

Continue dipping and adding choux in levels using the glaze to hold them together as you build up. (You may want to use toothpicks to hold them in place – see video #4 below).

When you have finished the design of your piece montée, you may drizzle with remaining glaze or use ribbons, sugar cookie cut-outs, almonds, flowers, etc. to decorate. Have fun and enjoy! Bon appétit!

Saturday, May 22, 2010

Rhubarb Sauce


One last rhubarb recipe! I finially finished up the stash of rhubarb my mom shared with me-- she gave me enough to make 2 loaves of bread, 2 pies and one batch of rhubarb sauce! That's a lot of rhubarb (and believe it or not, I could eat more!)!

This is another childhood favorite. I know people use rhubarb sauce as a topping to ice cream or to accompany some tasty muffins, but I like it straight from a spoon!

I added a wee bit more sugar since the rhubarb I was using was more green/tart than red/sweet. I also added a few drops of red food coloring to give it a pinker hue. I also added in a smidgen of vanilla at the end, too.

Ingredients

2 tablespoons unsalted butter
4 cups thinly sliced rhubarb
1/2 cup white sugar

Directions
In large skillet, melt butter over high heat. Stir in rhubarb and sugar and continue to cook, stirring constantly, until tender, 5 to 10 minutes. Serve warm.

Look how cute my little crab bowl is that I got in Florida in March!

Friday, May 21, 2010

Rhubarb Pie


Another rhubarb recipe! I've never made a rhubarb pie. I had no idea it was so easy! I think the crust took longer than the actual pie filling. My crust was a little too thick, so I'll have to make sure I roll it thinner next time tomorrow when I make another pie to give to our neighbors.

I used my mom's pie crust recipe-- never buy frozen when making homemade is so easy and so much more tasty!


Pie crust:
(okay, as I'm typing this, I now see why my crust was so thick! This recipe is for a 2-crust pie, such as rhubarb pie. I thought it was for a one crust, so I made a double batch! Ooops! Don't make that mistake-- just roll thinner with this recipe)

2 cups flour
1/2 tsp salt
2/3 cup shortening
6-7 tablespoons water

Using a pastry blender, cut half of the shortening into flour and salt until it's like meal. Put the remaining shortening into the mixture and blend until it resembles large peas.

Add 1 tablespoon of water at a time, until doughy.

Divide dough into two mounds.

Roll out 1 inch bigger than pan.
(If you are making a pie that requires a pre-baked crust, bake at 475° for 8-10 minutes.)
* Be sure to save your pie crust scraps so you can brush on some egg white and then sprinkle with cinnamon sugar and bake until just golden for some tasty pie-crust cookies!

Rhubarb Pie

Ingredients
4 cups chopped rhubarb
1 1/3 cups white sugar
6 tablespoons all-purpose flour
1 tablespoon butter
1 recipe pastry for a 9 inch double crust pie

Directions
Preheat oven to 450°.

Combine sugar and flour. Sprinkle 1/4 of it over pastry in pie plate. Heap rhubarb over this mixture. Sprinkle with remaining sugar and flour. Dot with small pieces of butter. Cover with top crust and pinch edges to seal.

Brush top of pie crust with a lightly beaten egg white and sprinkle with sugar.

Place pie on lowest rack in oven. Bake for 15 minutes. Reduce oven temperature to 350° F and continue baking for 40 to 45 minutes. Serve warm or cold.

Wednesday, May 19, 2010

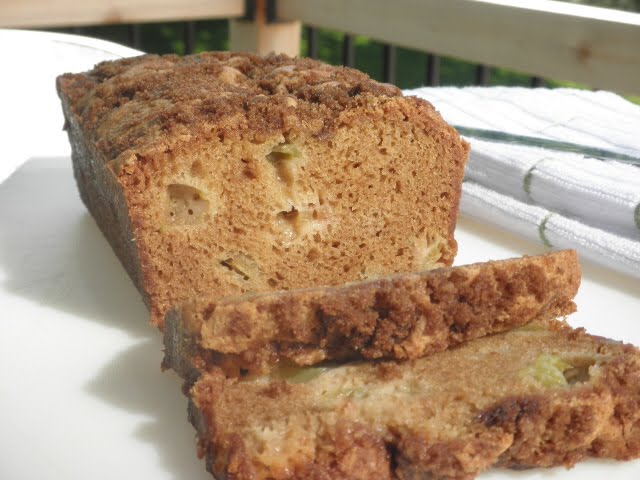
Rhubarb Bread


Tis the season for one of the yummiest........ ??? things ???.......... (is rhubarb considered a fruit or a vegetable? We are split 50/50 in my house as to what it is) in the world. Rhubarb. I can't harvest mine until next year since it was planted last Spring, but my mom was kind enough to share the rhubarb she inherited with me! I can hardly wait until mine is ready; my kids can have the same memories I have of eating stalks of rhubarb straight from the garden.... dipping the end in a bowlful of white sugar and sucking off the sweetness before biting into the tart stalk (it must be a vegetable.... if it were a fruit, it wouldn't need sugar, now would it?)!

I made this bread today- I didn't have any nuts on hand, but it was delicious despite that fact! Also, 40 minutes wasn't nearly long enough for baking. Mine took closer to a full hour, but I checked it every few minutes starting at 40 minutes.

Ingredients

1 cup milk
1 tablespoon lemon juice
1 teaspoon vanilla extract
1 1/2 cups brown sugar
2/3 cup vegetable oil
1 egg
2 1/2 cups all-purpose flour
1 teaspoon salt
1 teaspoon baking soda
1 1/2 cups chopped rhubarb
1/2 cup chopped walnuts
1/4 cup brown sugar
1/2 teaspoon ground cinnamon
1 tablespoon butter, melted

Directions

Preheat oven to 325 degrees F (165 degrees C). Lightly grease two 9x5 inch loaf pans.

In a small bowl, stir together milk, lemon juice and vanilla; let stand for 10 minutes.

In a large bowl, mix together 1 1/2 cups brown sugar, oil and egg. Combine the flour, salt and baking soda, stir into sugar mixture alternately with the milk mixture just until combined. Fold in rhubarb and nuts.

Pour batter into prepared loaf pans.

In a small bowl, combine 1/4 cup brown sugar, cinnamon and butter. Sprinkle this mixture over the unbaked loaves.

Bake in preheated oven for 40 minutes, until a toothpick inserted into center of a loaf comes out clean.

Tuesday, May 11, 2010

Beer Bread


Who needs to attend a Tastefully Simple home party and spend $6 on a box mix of beer bread when you can make it yourself at home-- with staple ingredients? It's a favorite around here and can be made in the same amount of time that the processed box mix crap can be made.

Ingredients:
3 cups of all purpose flour
1/3 cup of sugar
1 tsp salt
1 tablespoon baking powder
12 oz of beer (or pop like 7-Up, Sprite, Ginger Ale)
2 tbsp butter, melted

Directions:
Mix all the dry ingredients in a bowl. Gently pour in the beer and mix until just blended. Batter will be thick.

Pour into a greased loaf pan and pour melted butter over the top of bread batter. Bake at 375° for 45 minutes or until toothpick comes out clean.

Remove from pan and let cool on a baking rack.
Cut in cubes and serve with your favorite dip or just eat it by the slice!

Monday, April 5, 2010

Peeps Sunflower Cake


This bright and cheery cake is so easy, that anyone could make it! In fact, my 7 year old helped me with mine and I didn't even have to go all control-freak on him and redo his areas!

Ingredients:
1 two-layer baked and frosted cake (recipe for chocolate cake below)
17-20 yellow Peeps chicks
chocolate chips (I used milk chocolate chips as well as mini chips for the center)

Directions:
Prepare and bake cake.

1. Level and frost cake when it has completely cooled.

2. Without separating Peeps and curving slightly to fit, arrange chicks around edge of cake for sunflower petals.

3. For sunflower seeds, arrange chocolate chips in center of cake.


**"Perfectly Chocolate" Chocolate Cake recipe:**

Ingredients:
2 cups sugar
1-3/4 cups all-purpose flour
3/4 cup HERSHEY'S Cocoa
1-1/2 teaspoons baking powder
1-1/2 teaspoons baking soda
1 teaspoon salt
2 eggs
1 cup milk
1/2 cup vegetable oil
2 teaspoons vanilla extract
1 cup boiling water
"PERFECTLY CHOCOLATE" CHOCOLATE FROSTING(recipe follows)

Directions
:
1. Heat oven to 350°F. Grease and flour two 9-inch round baking pans.

2. Stir together sugar, flour, cocoa, baking powder, baking soda and salt in large bowl. Add eggs, milk, oil and vanilla; beat on medium speed of mixer 2 minutes. Stir in boiling water (batter will be thin). Pour batter into prepared pans.

3. Bake 30 to 35 minutes or until wooden pick inserted in center comes out clean. Cool 10 minutes; remove from pans to wire racks. Cool completely. Frost with "PERFECTLY CHOCOLATE" CHOCOLATE FROSTING. 10 to 12 servings.


"PERFECTLY CHOCOLATE" CHOCOLATE FROSTING


1/2 cup (1 stick) butter or margarine
2/3 cup HERSHEY'S Cocoa
3 cups powdered sugar
1/3 cup milk
1 teaspoon vanilla extract

Melt butter. Stir in cocoa. Alternately add powdered sugar and milk, beating to spreading consistency. Add small amount additional milk, if needed. Stir in vanilla. About 2 cups frosting.

Friday, February 12, 2010

Mario Bros. Cupcakes/ Homemade Fondant


My friend Candy made cute cupcake for her son Kyle's birthday- they were decorated like the Mario Bros. mushrooms. I knew my son would love them just as much since Mario Bros. is basically his first language. While I was searching for some character pictures to print, I stumbled upon some cupcakes that were decorated with fondant. They were from a bakery and the Mario Bros. fondant character cupcakes were available for purchase. Yeah.... I don't think so.

I found a great recipe for marshmallow fondant. It seriously couldn't be easier (although it'd be nice if it were a little less messier!). I used this receipe to make my own Mario Bros. cupcakes with fondant!


The site I found the original recipe at is here, but here is also the recipe:

16 ounces white mini-marshmallows (use a good quality brand)

2 to 5 tablespoons water

2 pounds icing sugar (please use C&H Cane Powdered Sugar for the best results)

1/2 cup Crisco shortening (you will be digging into it so place in a very easily accessed bowl)

Melt marshmallows and 2 tablespoons of water in a microwave or double boiler: Put the bowl in the microwave for 30 seconds, open microwave and stir, back in microwave for 30 seconds more, open microwave and stir again, and continue doing this until melted. It usually takes about 2 1/2 minutes total (mine literally took one minute) Place 3/4 of the powdered sugar on the top of the melted marshmallow mix.

Now grease your hands GENEROUSLY (palms, backs, and in between fingers), then heavily grease the counter you will be using and dump the bowl of marshmallow/sugar mixture in the middle.

Start kneading like you would bread dough.

Keep kneading, this stuff is sticky at this stage! Add the rest of the powdered sugar and knead some more. Re-grease your hands and counter when the fondant starts sticking. If the mix is tearing easily, it is to dry, so add water (about 1/2 tablespoon at a time and then knead it in). It usually takes me about 8 minutes to get a firm smooth elastic ball so that it will stretch without tearing when you apply it to the cake.

It is best if you can let it sit, double wrapped, overnight (but you can use it right away if there are no tiny bits of dry powdered sugar). If you do see them, you will need to knead and maybe add a few more drops of water. (I used it immediately)

Prepare the fondant icing for storing by coating it with a good layer of Crisco shortening, wrap in a plastic-type wrap product and then put it in a re-sealable or Ziploc bag. Squeeze out as much air as possible.

MM Fondant icing will hold very well in the refrigerator for weeks.

Now it’s time to start. Your cake should be baked, and completely cooled. If you have a shaped cake, you can trim it now and then place the cake on a prepared cake board. In other words, you are assembling the cake puzzle on the board. You can also place the cake on the board first and then trim (you must be extra careful not to damage the covered board). I personally find that shaping first is the easiest and then transferring the cake.

Give the top and sides of the cake a nice thick 1/4-inch coating of buttercream icing . The buttercream icing helps the fondant icing to “stick” to the cake and this cushion of undercoating icing helps to give you the beautiful smooth nearly perfect finish that you are looking for.

When you are ready to use the rested fondant icing, the first thing you need to do is decide what size you will need to roll your icing to.

Next, you need to sprinkle a bit of cornstarch on your counter to help prevent sticking (rub it in). Give the fondant icing a little kneading to incorporate the Crisco coating. It will be pretty stiff when you try to knead it again, but it can be microwaved for 10 to 20 seconds, if necessary. Start off with 10 seconds (please be careful as items that have high sugar contents can get hot in the microwave very quickly).

The fondant icing will soften right up and be perfect for rolling out and playing with. You want the temperature to be close to your body temperature.

Now is the best time to add your food coloring. I prefer to store my fondant icing in it’s natural color of white. Some colors can change the consistency of the icing. If you do need to store colored fondant icing, wrap each color very well in plastic wrap or Saran Wrap. Colors like red and burgundy are notorious for “bleeding” into other colors and ruining them. It’s better to be safe than sorry. Bag everything in Ziploc bags. Remember that food coloring can also stain your hands and nails. I have food-grade plastic gloves that I keep around. Add your food coloring, a little at a time, and knead it in. You can always go darker but it is difficult to go lighter. Red has a tendency to get darker as it sits and “ages”.

Pre-shape your icing into approximately the shape of your cake. For a round cake, make a disk shape. For a rectangular make a log shape.

OK, here is a point of controversy about the next step. Some instructors tell you to only sprinkle cornstarch on your counter before you put the fondant icing down, sprinkle with more corn starch, and then roll fondant icing out to desired shape. Some teachers advise that you grease the counter, put the fondant icing down, and lightly grease the top of the fondant icing as need to prevent sticking. (It worked way better for me to grease the counter-- I layed the fondant so the cornstarch made it too dry but the shortening helped adhere the layers)

I prefer the cornstarch myself, but during very dry atmospheric conditions, I have been known to use the shortening method. The grease will help to hold in the moisture and keeps the fondant icing pliable. If necessary, add drops of water and knead it in thoroughly before proceeding. You will need to try out both ways in the future and decide what you like the most.

A third alternative is a large-sized Roulpat Mat (31 x 23 inches). It really does work well and it can also help you with moving a large piece of rolled out fondant. I’ve never done it, but I was told that you just gently bend the mat edges downward with the icing still on it. Place the edge of mat and the icing next to the edge of the butter-creamed cake and flip the fondant icing over the cake. What was the top of the fondant icing that you rolled out, is now touching the buttercream and what was the bottom side is now the topside that you see.

Most folks do not have a nonstick rolling pin, but if you do, now is the time to use it. If not, lightly rub cornstarch on the surface of the rolling pin and roll out to the desired size.

I like to roll my icing at least 1/8-inch thick. It’s thick enough for ease of handling and strength integrity. I wouldn’t go any thinner than 1/8-inch for the cake covering. When I’m making decorations with the fondant icing, I will sometimes roll it thinner. The MM Fondant icing is very forgiving and rarely tears but everything has it limits.

The technique that I use is to gently roll the icing on the nonstick rolling pin like a piece of fabric. DO NOT FOLD! An edge will be hanging down.

Quickly place the fondant icing at one bottom edge of the cake and unroll the rolling pin, holding it about 2 inches over the cake. Your fondant icing will then “fall” into place. You should also have a bit of overhang over the edges.

You might need a little cornstarch at this stage, but only use it very sparingly if you have a dark colored icing. I very lightly sprinkle the cornstarch over the surface and use a buffing motion with my hand to move it around and to level the surface. This motion seals the fondant icing to the buttercream, works out the bumps in the icing below the surface, and removes flaws from the joined areas in the cakes surface below. Please use a VERY gentle pressure to rub the surface of the icing. I often have a little pile of the cornstarch on the counter and dip my hands in it as needed. Here is an important tip: Watch out for your fingernails as long nails can mark up your surface quickly and it is very difficult to smooth them back out.

If you notice a bubble in the surface, take a thin sharp needle and poke a tiny hole, at an angle, in the bubble. If you poke straight down, you can almost always see the hole even after the most careful smoothing. The angled hole lets the air out of the bubble, and with a tiny bit of rubbing you can reseal the hole.

I keep a clean, soft pastry brush close by, to move the cornstarch around. Do this lightly or you can leave brush marks on the surface that are almost impossible to remove. A number of companies make fondant smoothers for around $10. I have one, but I’ve used it only once and I’ve used my hands ever since. For me, it is easier and quicker. If you don’t handle the smoother correctly, you can damage the fondant’s finish.

Gently, with the side of your hand, push the fondant into the sides of the cake against the cake board.

To trim the excess fondant icing, you can use a sharp knife. I find that the easiest and neatest way is to use a Pizza Cutter. Hold it at a 45 degree angle from the cake board and the side of the cake. Go slow and follow the shape of the cake. If you hold the cutter at the correct angle, you will have an almost perfect bottom edge. Gently, with your finger tips, push any little leftovers in against the cake for the neatest appearance. If the edge isn’t as nice as you want, you can always add a fondant rope or pearls. Buttercream shells, stars, or flowers look wonderful also.
If your cake needs a bit of shaping, do it now. I used the outside edge of my hand to make the indents to define certain areas of the cake.

Tuesday, February 2, 2010

Bounty Bars- Coconut Chocolates


Just in time for Valentine's Day! How pretty are these coconut candies? They taste like a Mounds Bar or an Almond Joy, minus the joy of the almond! They are extremely sweet, so I cut them to be bite-sized. I'm sure you could cut them into more of a candy-bar size if you really want the full effect of a candy bar.

Ingredients:

1/2 cup heavy cream
1 1/2 cups sugar
2 sticks plus 2 tablespoons butter (18 tablespoons)
3 cups shredded coconut
4 oz dark chocolate (I actually used semi-sweet)
2 Tbsp oil

Directions:

Dice butter; put cream, sugar and butter in a medium saucepan and heat until it boils, stirring almost constantly. Boil for another 5 minutes, while stirring constantly with a wooden spoon.

Remove from heat and stir in coconut.

Line an 8x8 baking pan with waxed paper and pour the mixture into pan. Cover pan with plastic wrap and refrigerate overnight.

The next day, turn it out onto a cutting board and remove the paper.

Cut it into cubes or into shape of a rectangular cuboid (which is the original shape of a Bounty candy bar).


Combine chocolate and oil in the top portion of a double boiler. Heat until melted. Dip each coconut cube in the melted chocolate to coat.

Allow to dry on waxed paper. I put it in the fridge to speed up the process.

Serve at room temperature (or cold.... whatever!).

Wednesday, January 27, 2010

January Daring Bakers-- Nanaimo Bars


Where has the month gone? I will be finished with school in December, and when I say that the time felt like it was creeping slowly up until graduation, remind me of how often these Daring Baker Challenges came up and remind me of how little I posted to this blog in between challenges! Wow-- not a single post since last month's challenge. I'm pathetic.

The January 2010 Daring Bakers’ challenge was hosted by Lauren of Celiac Teen. Lauren chose Gluten-Free Graham Wafers and Nanaimo Bars as the challenge for the month. The sources she based her recipe on are 101 Cookbooks and www.nanaimo.ca.

This month's challenge is in honor of the 2010 Winter Olympics being held in Vancouver, British Columbia. Nanaimo Bars (pronounced Nah-nye-Moh) are a classic Canadian dessert created in none other than Nanaimo, British Colombia. These bars have 3 layers: a base containing graham crackers, cocoa, coconut and nuts, a middle custard layer, and a topping of chocolate.


Now, going into this challenge, I knew I wouldn't like the results. I don't like graham crackers and I've only once ever made Nanaimo bars and I didn't like them either. I was hoping to be pleasantly surprised with the results, but unfortuntely, I still don't like either of them! But I'd say that was a successful challenge, woudln't you? If I ended up liking something I didn't like previously, then that would mean that I made them wrong! So I must have reached success this month!

However, even though I don't like the taste of either of the recipes, I must say they both turned out rather striking!

Oh, and I didn't make my recipe to be gluten-free. I already knew I wouldn't like the results and I didn't want to spend the extra on ingredients that I'd probably never use again, so I went ahead and used regular ingredients. If you'd like the recipe for gluten-free, check out the other Daring Bakers creations!


Graham Cracker Recipe

2 1/2 cups plus 2 tablespoons unbleached pastry flour or unbleached all-purpose flour
1 cup dark brown sugar, lightly packed
1 teaspoon baking soda
3/4 teaspoon kosher salt
7 tablespoons unsalted butter, cut into 1-inch cubes and frozen
1/3 cup mild-flavored honey, such as clover
5 tablespoons whole milk
2 tablespoons pure vanilla extract

For the topping:

3 tablespoons granulated sugar
1 teaspoon ground cinnamon

In the bowl of a food processor fitted with the steel blade or in the bowl of an electric mixer fitted with the paddle attachment, combine the flour, brown sugar, baking soda, and salt. Pulse or mix on low to incorporate. Add the butter and pulse on and off on and off, or mix on low, until the mixture is the consistency of a coarse meal.


In a small bowl, whisk together the honey, milk, and vanilla extract. Add to the flour mixture and pulse on and off a few times or mix on low until the dough barely comes together. It will be very soft and sticky.

Turn the dough out onto a lightly floured work surface and pat the dough into a rectangle about 1 inch thick. Wrap in plastic and chill until firm, about 2 hours or overnight.

To prepare the topping: In a small bowl, combine the sugar and cinnamon, and set aside.

Divide the dough in half and return one half to the refrigerator. Sift an even layer of flour onto the work surface and roll the dough into a long rectangle about 1/8 inch thick. The dough will be sticky, so flour as necessary. Trim the edges of the rectangle to 4 inches wide.

Working with the shorter side of the rectangle parallel to the work surface, cut the strip every 4 1/2 inches to make 4 crackers. Gather the scraps together and set aside. Place the crackers on one or two parchment-lined baking sheets and sprinkle with the topping. Chill until firm, about 30 to 45 minutes. Repeat with the second batch of dough.


Adjust the oven rack to the upper and lower positions and preheat the oven to 350 degrees.

Gather the scraps together into a ball, chill until firm, and reroll. Dust the surface with more flour and roll out the dough to get about two or three more crackers.

Mark a vertical line down the middle of each cracker, being careful not to cut through the dough. Using a toothpick or skewer, prick the dough to form two dotted rows about 1/2 inch for each side of the dividing line.


Bake for 25 minutes, until browned and slightly firm to the tough, rotating the sheets halfway through to ensure even baking.

mine were a little too thick, but still tasted nasty like a graham cracker.


Nanaimo Bars

-Bottom Layer-
1/2 cup Unsalted Butter
1/4 cup Granulated Sugar
5 tablespoons Unsweetened Cocoa
1 Large Egg, Beaten
1 1/4 cups Graham Wafer Crumbs
1/2 cup Almonds, Finely chopped
1 cup Coconut (Shredded, sweetened or unsweetened)

-Middle Layer-
1/2 cup Unsalted Butter
2 tablespoons and 2 teaspoons Heavy Cream
2 tablespoons Vanilla Custard Powder -Vanilla pudding mix may be substituted
2 cups Icing Sugar

-Top Layer-
4 ounces Semi-sweet chocolate
2 tablespoons Unsalted Butter

Directions:
1. For bottom Layer: Melt unsalted butter, sugar and cocoa in top of a double boiler. Add egg and stir to cook and thicken. Remove from heat. Stir in crumbs, nuts and coconut. Press firmly into an ungreased 8 by 8 inch pan.


2. For Middle Layer: Cream butter, cream, custard powder, and icing sugar together well. Beat until light in colour. Spread over bottom layer.


3. For Top Layer: Melt chocolate and unsalted butter over low heat. Cool. Once cool, pour over middle layer and chill.

Saturday, December 26, 2009

December Daring Bakers-- Gingerbread Houses


The December 2009 Daring Bakers’ challenge was brought to you by Anna of Very Small Anna and Y of Lemonpi. They chose to challenge Daring Bakers’ everywhere to bake and assemble a gingerbread house from scratch. They chose recipes from Good Housekeeping and from The Great Scandinavian Baking Book as the challenge recipes.


What a fun challenge! I will probably make this a tradition each year; I've bought the kits before but never realized how easy it is to bake it myself. I can hardly wait to try it again and modify the shape of my house! I didn't have a single problem, other than the dough being too dry at the beginning. I only used about 7 and a half cups of flour and it was already dry so I never added the remaining cup and a half. It didn't seem to make a difference- the finished product was perfectly tasty and formed!

I made one batch and it gave us enough to make all three of these houses! I made one and both of my children were able to make one! I didn't help at all with theirs; they both were able to make their own custom homes! Future builders (once the recession recesses?)?

Preparation Time

10 minutes to mix the dough
4-8 hours at least to chill it
5 minutes to roll
10 to rest
10 to cut
Another 30 minutes to rest, if necessary
25-30 minutes to bake, depending on the size of the pieces

I would estimate 2-4 hours to decorate, depending on how ornate you want to make everything. It could certainly take longer if you are doing a lot of intricate royal icing designs or making your own candies. Altogether, this will take 7-13 hours, including chilling time

Ingredients:

2 1/2 cups packed dark brown sugar
1 1/2 cups heavy cream or whipping cream
1 1/4 cups molasses
9 1/2 cups all-purpose flour
2 tablespoons baking soda
1 tablespoon ground ginger

1. In very large bowl, with wire whisk (or with an electric mixer), beat brown sugar, cream, and molasses until sugar lumps dissolve and mixture is smooth.

*Tip* When pouring molasses or other things of the like, spray a measuring cup with nonstick cooking spray first; the molasses will slide right out!

In medium bowl, combine flour, baking soda, and ginger. With spoon, stir flour mixture into cream mixture in 3 additions until dough is too stiff to stir, then knead with hands until flour is incorporated and dough is smooth.


(see my "big cup of tea" in the background? That's the soul of my blog!)


2. Divide dough into 4 equal portions; flatten each into a disk to speed chilling. Wrap each disk well with plastic wrap and refrigerate at least 4 hours or overnight, until dough is firm enough to roll.


Be sure to take your jewelry off before handling the dough or else you're left with this:


3. Grease and flour large cookie sheets 17-inch by 14-inch

4. Roll out dough, 1 disk at a time on each cookie sheet to about 3/16-inch thickness. (Placing 3/16-inch dowels or rulers on either side of dough to use as a guide will help roll dough to uniform thickness.)


We dug out the Play-Doh cutters for this project! It seemed as if we had our own zoo made from gingerbread by the time we were done!

Bears included!

5. Trim excess dough from cookie sheet; wrap and reserve in refrigerator. Chill rolled dough on cookie sheet in refrigerator or freezer at least 10 minutes or until firm enough to cut easily.

6. Preheat oven to 300 degrees F

7. Use chilled rolled dough, floured poster board patterns, and sharp paring knife to cut all house pieces on cookie sheet, making sure to leave at least 1 1/4 inches between pieces because dough will expand slightly during baking. Wrap and reserve trimmings in refrigerator. Combine and use trimmings as necessary to complete house and other decorative pieces. Cut and bake large pieces and small pieces separately.


8. Chill for 10 minutes before baking if the dough seems really soft after you cut it. This will discourage too much spreading/warping of the shapes you cut.


9. Bake 25 to 30 minutes, until pieces are firm to the touch. Do not overbake; pieces will be too crisp to trim to proper size.

10. Remove cookie sheet from oven. While house pieces are still warm, place poster-board patterns on top and use them as guides to trim shapes to match if necessary. Cool pieces completely before attempting to assemble the house.


Royal Icing:
1 large egg white
3 cups powdered sugar
1 teaspoon white vinegar
1 teaspoon almond extract

Beat all ingredients until smooth, adding the powdered sugar gradually to get the desired consistency. Pipe on pieces and allow to dry before assembling.


If you aren't using it all at once you can keep it in a small bowl, loosely covered with a damp towel for a few hours until ready to use. You may have to beat it slightly to get it an even consistency if the top sets up a bit. Piped on the house, this will set up hard over time.


We had to find some support items to hold up the rooftop while waiting for the Royal Icing to dry: