Saturday, December 26, 2009

December Daring Bakers-- Gingerbread Houses


The December 2009 Daring Bakers’ challenge was brought to you by Anna of Very Small Anna and Y of Lemonpi. They chose to challenge Daring Bakers’ everywhere to bake and assemble a gingerbread house from scratch. They chose recipes from Good Housekeeping and from The Great Scandinavian Baking Book as the challenge recipes.


What a fun challenge! I will probably make this a tradition each year; I've bought the kits before but never realized how easy it is to bake it myself. I can hardly wait to try it again and modify the shape of my house! I didn't have a single problem, other than the dough being too dry at the beginning. I only used about 7 and a half cups of flour and it was already dry so I never added the remaining cup and a half. It didn't seem to make a difference- the finished product was perfectly tasty and formed!

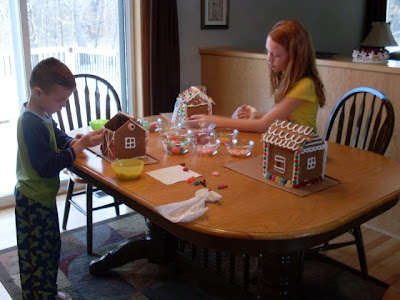
I made one batch and it gave us enough to make all three of these houses! I made one and both of my children were able to make one! I didn't help at all with theirs; they both were able to make their own custom homes! Future builders (once the recession recesses?)?

Preparation Time

10 minutes to mix the dough
4-8 hours at least to chill it
5 minutes to roll
10 to rest
10 to cut
Another 30 minutes to rest, if necessary
25-30 minutes to bake, depending on the size of the pieces

I would estimate 2-4 hours to decorate, depending on how ornate you want to make everything. It could certainly take longer if you are doing a lot of intricate royal icing designs or making your own candies. Altogether, this will take 7-13 hours, including chilling time

Ingredients:

2 1/2 cups packed dark brown sugar
1 1/2 cups heavy cream or whipping cream
1 1/4 cups molasses
9 1/2 cups all-purpose flour
2 tablespoons baking soda
1 tablespoon ground ginger

1. In very large bowl, with wire whisk (or with an electric mixer), beat brown sugar, cream, and molasses until sugar lumps dissolve and mixture is smooth.

*Tip* When pouring molasses or other things of the like, spray a measuring cup with nonstick cooking spray first; the molasses will slide right out!

In medium bowl, combine flour, baking soda, and ginger. With spoon, stir flour mixture into cream mixture in 3 additions until dough is too stiff to stir, then knead with hands until flour is incorporated and dough is smooth.


(see my "big cup of tea" in the background? That's the soul of my blog!)


2. Divide dough into 4 equal portions; flatten each into a disk to speed chilling. Wrap each disk well with plastic wrap and refrigerate at least 4 hours or overnight, until dough is firm enough to roll.


Be sure to take your jewelry off before handling the dough or else you're left with this:


3. Grease and flour large cookie sheets 17-inch by 14-inch

4. Roll out dough, 1 disk at a time on each cookie sheet to about 3/16-inch thickness. (Placing 3/16-inch dowels or rulers on either side of dough to use as a guide will help roll dough to uniform thickness.)


We dug out the Play-Doh cutters for this project! It seemed as if we had our own zoo made from gingerbread by the time we were done!

Bears included!

5. Trim excess dough from cookie sheet; wrap and reserve in refrigerator. Chill rolled dough on cookie sheet in refrigerator or freezer at least 10 minutes or until firm enough to cut easily.

6. Preheat oven to 300 degrees F

7. Use chilled rolled dough, floured poster board patterns, and sharp paring knife to cut all house pieces on cookie sheet, making sure to leave at least 1 1/4 inches between pieces because dough will expand slightly during baking. Wrap and reserve trimmings in refrigerator. Combine and use trimmings as necessary to complete house and other decorative pieces. Cut and bake large pieces and small pieces separately.


8. Chill for 10 minutes before baking if the dough seems really soft after you cut it. This will discourage too much spreading/warping of the shapes you cut.


9. Bake 25 to 30 minutes, until pieces are firm to the touch. Do not overbake; pieces will be too crisp to trim to proper size.

10. Remove cookie sheet from oven. While house pieces are still warm, place poster-board patterns on top and use them as guides to trim shapes to match if necessary. Cool pieces completely before attempting to assemble the house.


Royal Icing:
1 large egg white
3 cups powdered sugar
1 teaspoon white vinegar
1 teaspoon almond extract

Beat all ingredients until smooth, adding the powdered sugar gradually to get the desired consistency. Pipe on pieces and allow to dry before assembling.


If you aren't using it all at once you can keep it in a small bowl, loosely covered with a damp towel for a few hours until ready to use. You may have to beat it slightly to get it an even consistency if the top sets up a bit. Piped on the house, this will set up hard over time.


We had to find some support items to hold up the rooftop while waiting for the Royal Icing to dry:



Tuesday, December 22, 2009

Life Savers Candy Cane Ornament


I found these directions for making cute lil candy cane ornaments on one of my recipe cards. I have no idea where it came from or when I cut it out (or why I didn't put a picture with it) but I thought we'd give them a try tonight.

What a fun project that was so easy! It goes like this, literally:
1. Unwrap.
2. Arrange.
3. Bake.
4. Hang.

For more detailed instructions, follow these:

Preheat oven to 325° F. Cover baking sheet with parchment paper or foil. Cut a 1 1/2 inch piece from a plastic drinking straw; set aside to make hole in ornament. Unwrap and arrange 7 individually wrapped Life Savers Five Flavor Hard Candies (sold in a bag) on paper into 6 inch candy cane shape (in any pattern you desire!).

Emily made one in the shape of an E!

Bake 3 to 6 minutes or until candies are melted. Remove from oven. Make a hole, about 1/2 inch from the top, by pressing the drinking straw piece into ornament, leaving in place until candy is cooled. (I found it hard to get out so I sprayed it with cooking spray and held it in place for a minute or two before letting go.)

Cool completely before removing ornament from paper. Gently remove straw. Thread a 6-8 inch piece of yarn, ribbon or shoestring licorice into the hold to hang the ornament. (Mine will last all of 1 day hanging... I'm sure the kids will be munching on them by this time tomorrow!)

*Prepare only one ornament at a time on each baking sheet. Since the candies melt at different rates depending on the color or the variety, baking more than one at a time could cause some ornaments to over-bake.

Monday, December 21, 2009

Homemade Marshmallows


What a perfect treat to top off your mug of hot cocoa this time of year! You can also roll the freshly cut marshmallow cubes in sprinkles for a cute holiday treat to share with loved ones.

This is Alton Brown's recipe-- I just love him and his recipes!


Ingredients

3 packages unflavored gelatin
1 cup ice cold water, divided
12 ounces granulated sugar, approximately 1 1/2 cups
1 cup light corn syrup
1/4 teaspoon kosher salt
1 teaspoon vanilla extract
1/4 cup confectioners' sugar
1/4 cup cornstarch
Nonstick spray

Directions
Place the gelatin into the bowl of a stand mixer along with 1/2 cup of the water. Have the whisk attachment standing by.

In a small saucepan combine the remaining 1/2 cup water, granulated sugar, corn syrup and salt. Place over medium high heat, cover and allow to cook for 3 to 4 minutes. Uncover, clip a candy thermometer onto the side of the pan and continue to cook until the mixture reaches 240 degrees F, approximately 7 to 8 minutes.


Once the mixture reaches this temperature, immediately remove from the heat.

Turn the mixer on low speed and, while running, slowly pour the sugar syrup down the side of the bowl into the gelatin mixture. Once you have added all of the syrup, increase the speed to high. Continue to whip until the mixture becomes very thick and is lukewarm, approximately 12 to 15 minutes.

It'll start like this:


and will get thicker:


and thicker:


and thicker:


and even thicker:


Add the vanilla during the last minute of whipping.


Until you're left with this:


While the mixture is whipping prepare the pans as follows:

For regular marshmallows:
Combine the confectioners' sugar and cornstarch in a small bowl. Lightly spray a 13 by 9-inch metal baking pan with nonstick cooking spray. Add the sugar and cornstarch mixture and move around to completely coat the bottom and sides of the pan. Return the remaining mixture to the bowl for later use.

When ready, pour the mixture into the prepared pan, using a lightly oiled spatula for spreading evenly into the pan.

It will take some elbow grease (and remember that cooking spray is your friend) to get it out of the bowl and into the prepared pans!


Be sure to spray your spatula and any other tools (fingers included) when working with the marshmallow.


And of course, don't forget to leave enough on your whisk/beaters so you can taste test the fluff!


Dust the top with enough of the remaining sugar and cornstarch mixture to lightly cover. Reserve the rest for later. Allow the marshmallows to sit uncovered for at least 4 hours and up to overnight.

Turn the marshmallows out onto a cutting board and cut into 1-inch squares using a pizza wheel dusted with the confectioners' sugar mixture. Once cut, lightly dust all sides of each marshmallow with the remaining mixture, using additional if necessary. Store in an airtight container for up to 3 weeks.

For miniature marshmallows:
Combine the confectioners' sugar and cornstarch in a small bowl. Line 4 half sheet pans with parchment paper, spray the paper with nonstick cooking spray and dust with the confectioners' sugar mixture.

Scoop the mixture into a piping bag fitted with a 1/2-inch round piping tip. Pipe the mixture onto the prepared sheet pans lengthwise, leaving about 1-inch between each strip. Sprinkle the tops with enough of the remaining cornstarch and sugar mixture to lightly cover. Let the strips set for 4 hours or up to overnight.

Cut into 1/2 inch pieces using a pizza wheel or scissors dusted with the confectioners' sugar mixture. Once cut, lightly dust all sides of each marshmallow with the remaining sugar mixture and store in an airtight container for up to a week.

Saturday, December 19, 2009

Easy Microwave Caramel


Need one last super easy, quick holiday treat? These are perfect fillers for that holiday tray you give to friends and family. I apologize for only having one picture; I had no intention of putting this on my blog but the results were so tasty that I couldn't pass up the opportunity. I quick grabbed the camera and snapped one shot while I was wrapping them up so that I had at least something to go with the recipe!

I make caramels every year-- they are delicious, but can be tricky if you don't have a good candy thermometer. It's time consuming, too.... to stand there watching and stirring making sure that it doesn't burn and waiting for it to reach the right temp, only to have it hover a few degrees lower than what it needs to be at..... and then to find that you should have pulled it all along. In fact, here is last years entry when I made caramels.

This year, I stumbled upon a microwave caramel recipe. In fact, it came from my aunt Peggy; she had forwarded me one of those emails that is filled to the galore with clickable links for hundreds of cookie/candy sweet treat recipes. I gave this recipe a try today and will never ever make it on the stove top again! It's a perfect recipe that does not require a thermometer! The recipe is a bit vague on cooking times-- a large 2 minute window. I cooked my batch for a total of 6 minutes and 15 seconds and it's a tad too soft-- but still perfect. I just had to refrigerate it before cutting since it's soft. But it's perfect consistency for eating. I'll probably cook my next batch another 30 seconds and I think it will be perfect.

I also added a tsp of vanilla just before pouring into the 8x8... I prefer my caramels to be vanilla caramel. I also lined the baking pan with plastic wrap (or alum foil) and buttered that instead of the pan itself. It made it easy to pop out of the pan for cutting.

I got about 66 caramels from the recipe.

Ingredients
1/2 cup butter (not margarine)
1/2 cup brown sugar
1/2 cup white granulated sugar
1/2 cup white corn syrup
1/2 cup sweetened condensed milk
1/2 cup chopped nuts (optional)
1 tsp vanilla (I added this to the recipe)


Directions

Using large microwave-safe dish, melt butter. Add corn syrup, sugars and milk. Stir well and microwave for 6-8 minutes, stirring half way through time. (6 minutes is too short for my 1000 watt microwave, but 8 minutes is too long.  7:30 is just perfect!)
Remove from microwave and add vanilla; stir. Pour into greased 8x8 pan and refrigerate for 30 minutes.  Allow to cool on a counter top until they reach room temperature. 
Cut into pieces (I like to sprinkle them with sea salt at this point) and wrap in wax paper (twist the ends).

Tuesday, December 8, 2009

Christmas Frosted Sugar Cookies

clockwise: My niece Megan, my neice Lauren, my neice Delaney, my daughter Emily, my son Nathan, my nephew Cameron, my nephew Landon and my nephew Daniel

Here is this years photo of our annual Frosting of the Christmas Sugar Cookies! The original post and recipe can be found here on my blog. They are the best sugar cookie you will ever eat!


Between my sisters and my mom and I, we have tens of dozens of cookies (in fact, I have about 10 dozen myself!) and we get together with all of the children on an afternoon just before Christmas and have a Frosting Party! What a neat tradition that I remember doing as a child and now our children will also remember doing!

Thursday, December 3, 2009

Pumpkin Ice Cream Torte


I was not able to be with my family this year on Thanksgiving and wouldn't you know that THIS was the year that my dad made a new pumpkin dessert to go with all of my mom's wonderful pies. He was kind enough to save some for me (I'm thankful for that!) and it was so delicious, that I just had to snap a picture of it and share the recipe.

Ingredients
3/4 cup graham cracker crumbs
2 tablespoons brown sugar
2 tablespoons finely chopped pecans
2 tablespoons butter, melted
Cooking spray
1 cup canned unsweetened pumpkin
1 teaspoon ground cinnamon
1/2 teaspoon ground allspice
1/8 teaspoon ground ginger
1/8 teaspoon ground cloves
9 cups vanilla low-fat ice cream (about 1 1/2 cartons), divided
1/4 cup finely chopped pecans, toasted and divided
1/4 cup jarred caramel topping
Preparation
1. Preheat oven to 350°.

2. Combine first 4 ingredients (mixture will be crumbly). Firmly press crumb mixture into bottom of a 9-inch springform pan coated with cooking spray. Bake at 350° for 10 minutes; cool on a wire rack.

3. Combine pumpkin and the next 4 ingredients (through cloves) in a bowl. Soften 6 cups ice cream; add to pumpkin mixture, stirring to blend. Spoon half of mixture into prepared pan. Cover with plastic wrap; freeze 1 hour or until firm. Cover and freeze remaining pumpkin ice cream.

4. Soften remaining 3 cups vanilla ice cream; stir in 3 tablespoons pecans. Spread over pumpkin ice cream layer; freeze 1 hour or until firm. Soften remaining 3 cups pumpkin ice cream; spread over vanilla ice cream mixture. Cover; freeze 8 hours or until firm. Cut torte into 12 wedges. Place 1 wedge on each of 12 plates. Place topping in microwave-safe bowl; microwave at HIGH 45 seconds. Top each serving with 1 tablespoon topping; sprinkle with 1/4 teaspoon pecans.

Friday, November 27, 2009

November Daring Bakers-- Cannoli


The November 2009 Daring Bakers Challenge was chosen and hosted by Lisa Michele of Parsley, Sage, Desserts and Line Drives. She chose the Italian Pastry, Cannolo (Cannoli is plural), using the cookbooks Lidia’s Italian-American Kitchen by Lidia Matticchio Bastianich and The Sopranos Family Cookbook by Allen Rucker; recipes by Michelle Scicolone, as ingredient/direction guides. She added her own modifications/changes, so the recipe is not 100% verbatim from either book.

Holy Cannoli! I'm telling you.... each month I think about resigning from the Daring Bakers due to time constraints (note how long ago my last entry was before this one.... I'm so lame!) and each month I am so grateful that I held on one more month! Cannoli's? Quite possibily a food sent straight from the heavens!

I had never tried Cannoli; in fact, I had never even seen Cannoli. They were on my list of things to eat before I die since I have heard only amazing things about them. I think I may have literally squealed with delight when I saw that Cannoli was this month's challenge. Now I've not only tried them but I've also made them!

They were much easier to make than I ever imagined they would be. That may be dangerous. Easy = make often. While I would love nothing more than to eat these little, delightful, rapturous tubes of bliss on a daily basis, the four cups of oil that was soaked up in the frying process will prevent that from happening. Thank goodness for "oil insurance".

I did not run into any problems while making the Cannoli. I do think that Cannoli tubes should be solid instead of hollow since they seem to be a fire waiting to happen. I was scared to death that the oil that came pouring out of each tube as it was lifted from the pan was going to drip onto the open flame leading to the kitchen going up in smoke (note to self: fix or buy a new deep fryer so that can be used the next time). However, a fire in my kitchen would help my arguement that I need new countertops (note to self: scratch that last note about the deep fryer.).

Here is the recipe for Cannoli/Cannolo from this month's challenge. Be sure to check out the Daring Baker's Blogroll to see other members creations!


Lidisano’s Cannoli
Makes 22-24 4-inch cannoli
Prep time:
Dough – 2 hours and 10-20 minutes, including resting time, and depending on whether you do it by hand or machine.
Filling – 5-10 minutes plus chilling time (about 2 hours or more)
Frying – 1-2 minutes per cannoli
Assemble – 20–30 minutes

CANNOLI SHELLS
2 cups all-purpose flour
2 tablespoons sugar
1 teaspoon unsweetened baking cocoa powder
1/2 teaspoon ground cinnamon
1/2 teaspoon salt
3 tablespoons vegetable or olive oil
1 teaspoon white wine vinegar
Approximately 1/2 cup sweet Marsala or any white or red wine you have on hand
1 large egg, separated (you will need the egg white but not the yolk)
Vegetable or any neutral oil for frying – about 2qts/8 cups
1/2 cup toasted, chopped pistachio nuts
Confectioners' sugar

CANNOLI FILLING
32 oz. (approx. 3.5 cups) ricotta cheese, drained
1 2/3 cups cup confectioner’s sugar, (more or less, depending on how sweet you want it), sifted
1/2 teaspoon ground cinnamon
1 teaspoon pure vanilla extract or the beans from one vanilla bean
3 tablespoons/1oz. finely chopped good quality chocolate of your choice
3 tablespoons toasted, finely chopped pistachios

Note - If you want chocolate ricotta filling, add a few tablespoons of dark, unsweetened cocoa powder to the above recipe, and thin it out with a few drops of warm water if too thick to pipe.

DIRECTIONS FOR SHELLS:
1. In the bowl of an electric stand mixer or food processor, combine the flour, sugar, cocoa, cinnamon, and salt. Stir in the oil, vinegar, and enough of the wine to make a soft dough. Turn the dough out onto a lightly floured surface and knead until smooth and well blended, about 2 minutes. Shape the dough into a ball. Cover with plastic wrap and let rest in the fridge from 2 hours to overnight.

2 Cut the dough into two pieces. Keep the remaining dough covered while you work. Lightly flour a large cutting or pastry board and roll the dough until super thin, about 1/16 to 1/8” thick (An area of about 13 inches by 18 inches should give you that). Cut out 3 to 5-inch circles (3-inch – small/medium; 4-inch – medium/large; 5-inch;- large. Your choice). Roll the cut out circle into an oval, rolling it larger and thinner if it’s shrunk a little.

3. Oil the outside of the cannoli tubes (You only have to do this once, as the oil from the deep fry will keep them well, uhh, oiled..lol). Roll a dough oval from the long side (If square, position like a diamond, and place tube/form on the corner closest to you, then roll) around each tube/form and dab a little egg white on the dough where the edges overlap. (Avoid getting egg white on the tube, or the pastry will stick to it.) Press well to seal. Set aside to let the egg white seal dry a little.

They already look pretty!


4. In a deep heavy saucepan, pour enough oil to reach a depth of 3 inches, or if using an electric deep-fryer, follow the manufacturer's directions. Heat the oil to 375°F (190 °C) on a deep fry thermometer, or until a small piece of the dough or bread cube placed in the oil sizzles and browns in 1 minute. Have ready a tray or sheet pan lined with paper towels or paper bags.

Wow, that's hot!

5. Carefully lower a few of the cannoli tubes into the hot oil. Do not crowd the pan. Fry the shells until golden, about 2 minutes, turning them so that they brown evenly.

I guess I had a wee little trouble-- 2 minutes was WAY TOO LONG for these! Mine actually took only about 30 seconds.

6. Lift a cannoli tube with a wire skimmer or large slotted spoon, out of the oil. Using tongs, grasp the cannoli tube at one end. Very carefully remove the cannoli tube with the open sides straight up and down so that the oil flows back into the pan. Place the tube on paper towels or bags to drain. Repeat with the remaining tubes. While they are still hot, grasp the tubes with a potholder and pull the cannoli shells off the tubes with a pair of tongs, or with your hand protected by an oven mitt or towel. Let the shells cool completely on the paper towels. Place shells on cooling rack until ready to fill.

This is what happens when you don't seal the dough onto the form with enough egg white! I had a few floaters that were not very pretty, but still were tasty!

7. Repeat making and frying the shells with the remaining dough. If you are reusing the cannoli tubes, let them cool before wrapping them in the dough.

Beautiful!

DIRECTIONS FOR FILLING:
1. Line a strainer with cheesecloth. Place the ricotta in the strainer over a bowl, and cover with plastic wrap and a towel. Weight it down with a heavy can, and let the ricotta drain in the refrigerator for several hours to overnight.

Lovely!

2. In a bowl with electric mixer, beat ricotta until smooth and creamy. Beat in confectioner’s sugar, cinnamon, vanilla and blend until smooth. Transfer to another bowl and stir in chocolate, zest and nuts. Chill until firm.(The filling can be made up to 24 hours prior to filling the shells. Just cover and keep refrigerated).

ASSEMBLE THE CANNOLI:
1. When ready to serve..fill a pastry bag fitted with a 1/2-inch plain or star tip, or a ziplock bag, with the ricotta cream. If using a ziplock bag, cut about 1/2 inch off one corner. Insert the tip in the cannoli shell and squeeze gently until the shell is half filled. Turn the shell and fill the other side. You can also use a teaspoon to do this, although it’s messier and will take longer.
2. Press or dip cannoli in chopped pistachios, grated chocolate/mini chocolate chips, candied fruit or zest into the cream at each end. Dust with confectioner’s sugar and/or drizzles of melted chocolate if desired.


TIPS AND NOTES:
- Dough must be stiff and well kneaded
- Rolling the dough to paper thinness, using either a rolling pin or pasta machine, is very important. If the dough is not rolled thin enough, it will not blister, and good cannoli should have a blistered surface.
- Initially, this dough is VERY stubborn, but keep rolling, it eventually gives in. Before cutting the shapes, let the dough rest a bit, covered, as it tends to spring back into a smaller shapes once cut. Then again, you can also roll circles larger after they’re cut, and/or into ovals, which gives you more space for filling.
- Your basic set of round cutters usually doesn’t contain a 5-inch cutter. Try a plastic container top, bowl etc, or just roll each circle to 5 inches. There will always be something in your kitchen that’s round and 5-inches if you want large cannoli.
- Oil should be at least 3 inches deep and hot – 360°F-375°F, or you’ll end up with greasy shells. I prefer 350°F - 360°F because I felt the shells darkened too quickly at 375°F.
- If using the cannoli forms, when you drop the dough on the form into the oil, they tend to sink to the bottom, resulting in one side darkening more. Use a slotted spoon or skimmer to gently lift and roll them while frying.
- DO NOT crowd the pan. Cannoli should be fried 2-4 at a time, depending on the width of your saucepan or deep fryer. Turn them once, and lift them out gently with a slotted spoon/wire skimmer and tongs. Just use a wire strainer or slotted spoon for flat cannoli shapes.
- When the cannoli turns light brown - uniform in color, watch it closely or remove it. If it’s already a deep brown when you remove it, you might end up with a really dark or slightly burnt shell.
- Depending on how much scrap you have left after cutting out all of your cannoli shapes, you can either fry them up and sprinkle with confectioner’s sugar for a crispy treat, or let the scraps rest under plastic wrap and a towel, then re-roll and cut more cannoli shapes.
- Push forms out of cannoli very gently, being careful not to break the shells as they are very delicate. DO NOT let the cannoli cool on the form, or you may never get it off without it breaking. Try to take it off while still hot. Hold it with a cloth in the center, and push the form out with a butter knife or the back of a spoon.
- When adding the confectioner’s sugar to the filling..TASTE. You may like it sweeter than what the recipe calls for, or less sweet, so add in increments.
- Fill cannoli right before serving! If you fill them an hour or so prior, you’ll end up with soggy cannoli shells.
- If you want to prepare the shells ahead of time, store them in an airtight container, then re-crisp in a 350°F (176 °C) oven for a few minutes, before filling.
- Practice makes perfect. My first batch of shells came out less than spectacular, and that’s an understatement. As you go along, you’ll see what will make them more aesthetically pleasing, and adjust accordingly when rolling. My next several batches turned out great. Don’t give up!!