Monday, July 16, 2012

DIY Bike Tube

I have no idea what to call this?  It's not a basket (especially since it's going on a boys bike; call me sexist).  It's a little compartment for boys to keep crap in while riding on their bike or scooter.  Should I call it a Bike Crap Holder?  A Crap Compartment?  A Crap Tube?  Tube-o-Crap?

Either way, I think it's brilliant.  My son is crap keeper.  He will stop in the middle of a store and pick up a tiny little end of a hanger and think he struck gold.  He will find a rubber band (broken ones or not) and shove that into his pocket.  He'll keep rocks, pop tabs, bottle caps, twist ties, pieces of broken cement.... you name it!  Anything crap he finds~ ends up in his pocket.   I usually have to sneak in his room and empty the pockets of the clothes in his hamper and sneak crap out of them to throw away.   Or sometimes I realize I forgot to empty them when I hear the unmistakable sound of a rock from Menards parking lot going around and around in the dryer.  Did I ever share the story of how I was sure we had a mouse in the duct work going out from the dryer?  It turned out to be Battleship game pieces.  We don't even have the game Battleship.

I just realized this Crap Keeper Tube is just enabling him.  Well, so long as it stays out of my dryer, I'm happy.  He can now collect crap all day long and put it safely inside of this tube and transfer it home (or to someone else's home?).

Back to business:  it's an empty Pringles tube!  So easy!  All we did was spray painted the washed out tube and then used tape to decorate it (you could skip the painting part if you have cool duct tape!)  2 tie-straps worked perfectly to fasten it tightly to the bike and it's set!  


Keep the lid so you can secure your items inside!


Saturday, August 13, 2011

Kit Kat Cake


I love this cake!  I saw it on this site and new that it would be so easy to make! 

All you  need is:
1 two layer frosted cake
28 mini Kit Kats (give or take- mine used 28)
1 medium bag (12.60 oz) of M&M's

To assemble the cake:
Open Kit Kat bars.  If you can't find the mini sized ones, you could use full size and just break them into sections of 2.  Gently press each Kit Kat into the frosting, along the outside of the cake.  Fill the center with the M&M's.

I forgot to slice the top off of my cake so that it would be shorter than the top edge of the Kit Kat's.  I think that would have looked better, but this still is sort of cute, right?  It's just a mound of M&M's instead of a dish of M&M's.

Wrap the entire cake with a cute bow and you're set!


Friday, July 15, 2011

Homemade Dulce de Leche

If you look up the definition of Dulce de Leche, you will learn that it means Milk Candy.  It is a mixture of sugar and cream and is heated slowly until it caramelizes and creates a thick, spreadable sauce.   It is very popular in Latin America and is used as a spread or a topping for ice cream.

A topping for ice cream?  I'm there.  And now you are, too, aren't you?

My husband loves Dulce de Leche ice cream from Schwan's.  It's a must-have whenever the yellow truck stops at our house.  Sadly, it's not often enough; but now we can easily make our own!  And when I say easily, I really do mean easily!

Here is what you need:


1 can of Sweetened Condensed Milk
1 large pot of water


That's it!  Oh, I suppose you also need about 2 hours of your time... but that can easily be accessible if you have a computer and a Facebook account nearby. (I mean, after all, don't you need to check on your animals in Farmville or stalk any and all public photo albums of people you knew, but didn't really like, in high school?)

To make the Ducle de Leche, all you do is remove the label from the can of sweetened-condensed milk and place it into the large pot of water.  Make sure the water is at least 2 inches over the can.  I placed my can on it's side... I'm not sure why, it's just how I was feeling at that particular time.  You could rebel and place it standing up if you want.


Bring the water to a boil and once you reach this point, keep your eye on the can to be sure that the water level doesn't evaporate down and expose the can.  I'm not sure what could happen- perhaps a nuclear explosion or maybe some seepage- who knows?  Maybe even nothing... but all I know is that you must keep the can covered with water at all times, or else.

Let it simmer for 2 hours.  Then remove the can from the water and let it cool before you attempt to open it.  This time, I'm pretty sure there would be some pressure that would release if you didn't wait to open it.   Plus it'd be really, really hot.  Ouch.

That's all you have to do!  Somehow the sweetened milk magically turns into beautiful, delicious caramel, just by boiling the can for two hours!  No stirring; no candy thermometer; no anything (except a boost in self esteem after looking at the picture of the girl that stole your first boyfriend)!


Make (okay, buy) some vanilla ice cream and pour your beautiful spread over a big dish of it; add it to brownies; dip cookies into it; enjoy it straight from the spoon!    Go ahead and eat it while snooping at more photos...  while wishing all of the calories onto the little number that friended your ex while you were still dating!

Thursday, May 26, 2011

Cake Pops


Do I just post my recipe and pretend not to notice the lack of blog posts here or do I explain that I've been MIA due to working nearly full-time (between two different school districts)? Hmmm.... you decide.

I will apologize for my lack of participation in my own blog. So many people I bump into comment on how much they miss my blog recipes and posts! That is so nice- I had no idea that people actually followed this and checked in regularly. I assumed that they just said that they did when they really didn't.

At least this awesome recipe will make up for lost time, right? Many of you foodies know who Bakerella is, as well as her Cake Pops. I have been dying to make them and finally had the perfect opportunity to try them out! My coworker, Angela, is getting married and I was asked to make the cake for her shower. The shower was hosted at a public restaurant, so instead of baking a big cumbersome cake or trying to transport 30 cupcakes (although I could achieve this easily with the cupcake carrier my mom gave me for Christmas! Love it!), I decided to try my hand at the Cake Pops.

Boy am I glad I did. They are as simple as this:

1. Make a cake.
2. Make a batch of frosting. Heck, buy a batch of frosting.
3. Crumble cake into a bowl.
4. Add frosting.
5. Mix thoroughly.
6. Roll dough into balls.
7. Stab balls with a stick.
8. Dunk in melted candy or chocolate.
9. Eat.

Any flavor cake and any flavor frosting will work. For the shower, I made one tray that contained Red Velvet cake mixed with Cream Cheese frosting and another tray that was just plain white cake with white frosting. (White cake, by the way, does not turn out crisp white like you would think it would. I forgot that the edges and top of white cake turns brown once it is baked, so the white wasn't a nice sharp white, but I'm probably the only one that noticed.).

Here are some pictures from the Cake Pops that I made:  (you can find Bakerella's instructions here.

This is my white cake crumbled in the bowl.  Just use your hands!  You don't even need equipment, although I wore gloves as I crumbled and blended the frosting in just because it's very messy and I think it's gross to serve cake that could have been under my fingernails to others.  But that's just me.


This is what the cake looks like after you've mixed in the frosting.  I thought I took a picture of the blob of frosting sitting in the crumbled cake, but apparently I didn't.  There wasn't anything spectacular looking about it; it just looked like a blob of frosting sitting on top of a cake crumbled into a bowl!

The cake balls are very easy to roll.  I did put the dough into the fridge to set up a little bit before rolling, but that's not necessary.  I noticed it gave the edges a smoother finish if the dough was a bit chilled.

After rolling the balls, I froze them to keep them fresh.  This works well for time management so that I could do the baking and rolling on one day and the actual dipping a different day.  It wouldn't be that bad to do it all in one day, but you have to allow time for the cake to cool completely before crumbling.

I dipped the lollipop sticks in some of the melted candy (I used the kind I get at my cake shop, but you can use Wilton Candy Melts or even chocolate or almond bark) and then inserted the stick into the cake ball.  I put them in the fridge so the candy could harden.   I also found that cold cake balls dip in the candy coating better, too.    (This is my Red Velvet batch!)


I don't have a picture of the actual dipping process because I was in a hurry while doing it and I had cake balls crumbling in the melted candy, which was causing me to panic.  However, I quickly learned that the trick is to dip cold cake balls.  I put the balls (with sticks) into the freezer for about half an hour and then went back to them for dipping.  It worked perfectly.  The room temperature cake balls were too soft and crumbled under the weight of the candy coating, so be sure to chill them.

After dipping (and tapping) each cake pop, place on a piece of wax paper and allow to set up.  I placed the finished pops into mini cupcake papers just because I thought it made them look more finished.  I also used a fork to drizzle some melted candy over the hardened cake pops, to add a little dimension and help cover up any flaws!

Didn't they turn out pretty? 

Monday, February 21, 2011

Melting Snowman Cookies


It has been snowing for 29 hours straight so I think that makes it a perfect day to make some Melting Snowman Cookies!  Granted, the weather isn't helping the snowman to melt but one can always wish, right?

I followed the tutorial found here: http://www.trulycustomcakery.com/tutorials/25.html .

You can use any sugar cookie recipe (heck, you could even use store-bought, unfrosted sugar cookies!) but I am a true fan of my my mom's recipe .

Instead of rolling and using cookie cutters to form the cookies, just take small balls of dough and flatten them out a bit and place them on the cookie sheet.  It doesn't matter if they are perfectly round since you want them to look like a melting blob anyway.


Bake the cookies and allow to cool. 


Once your cookies are baked, prepare the marshmallows by spraying a plate with cooking spray and setting about 7-8 marshmallows on it, spaced evenly.  Do not cook them yet, just have them on standby.


Now you can mix up some icing.   I just mixed about a cup or so of powdered sugar with some flavoring (either vanilla or almond; I used almond today because it's just what I grabbed) and a little bit of milk.  Add your liquids slowly-- the amount will vary, so I'm not even going to give an actual measurement.  You want to just add it until the icing is thin but not drippy.  When you spread it on the cookie, you want it to flow a little bit and not be too thick.  It's okay if it starts to ooze towards the edge of the cookie a little, but you don't want it to be so thin that all of it oozes and you end up seeing the yellowness of the cookie through the frosting.  Use your judgement; but remember, you can always add liquid but you can't take it away!  If it's too thin, add a little bit more powdered sugar.  If it's too thick, add a little bit more milk.

Now comes the fun part.

Once you have about 7-8 cookies frosted, set the plate of marshmallows in the microwave and cook on high for 15 seconds.  WATCH THEM.  You want them to puff up but not cook or explode. 


Grease your fingertips as well, and immediately place a marshmallow on top of each frosted cookie.  It's okay if they get denty and bumpy from your fingers since you want them to look like they are losing their shape anyway.


Follow these directions until you have all of the cookies with snowman heads on them. 


Tint any remaining icing the colors of your choice, and decorate your melting snowman.

Sunday, October 17, 2010

Halloween Cagey Ghosts

My sister claims she is not crafty. Ironically, I posted this picture of her house-o-lantern last year:


I posted the directions she followed here.

Last week, she sent me another picture of her house, decorated all cutely for Halloween.  She made Cagey Ghosts out of tomato cages.  I hadn't even begun to decorate for fall yet and she already had made a craft for Halloween.  Yeah... not crafty my glue gun.

So, instead of posting a picture of her cute Cagey Ghosts, I'll post the ones that I made today.  After all, I threw out the picture she sent me of her house in retaliation. 


These were pretty easy to make with things most people have at home.  (okay, who am I kidding--- I had to go buy tomato cages AND white sheets.  But seriously, most people probably do have that stuff at home.)  Don't use heavy duty tomato cages-- the thinner and cheaper, the better!  They are much easier to bend!  


Here are the instructions from Family Fun magazine:


  1. To make one, set up the cage as shown. To form the head, use duct tape to secure the rounded prongs of the cage. Thread the lights through the cage, and secure them with twist ties. 
  2. For each arm, ball up two socks and duct-tape them to a stick, placed in the ground.
  3. Add marker or pinned-on craft foam facial features to a white twin sheet, then drape it over the structure.


Saturday, October 2, 2010

September Daring Bakers- Sugar Cookies


The September 2010 Daring Bakers’ challenge was hosted by Mandy of “What the Fruitcake?!” Mandy challenged everyone to make Decorated Sugar Cookies based on recipes from Peggy Porschen and The Joy of Baking.

Sugar Cookies?  I got this challenge covered.  My mom and sisters and I devote an entire DAY to sugar cookies every year around Christmas time.  I can make and frost sugar cookies blindfolded.  With one hand behind my back.  In the dark.  (Oh wait, I'm blindfolded... the lights may be on)
 
So why am I finally completing September's challenge on October 2?  I guess the same reason I haven't blogged any fun food things since August 27th, ironically last month's DB challenge. 
 
I've been saying it for months (a year?)  I've become a blogging loser.  School has taken priority for me... and now...sadly.... I have to say that work will be taking priority.  After 12 years of being a stay-at-home mom, I'm going back to work next week.
 
Will I continue with the Daring Bakers?  Maybe.  I hope to.... especially after reading what the October challenge entails..... I can't leak any hints, but it will be delish.
 
So onto last months challenge that I've made this month.  Sugar Cookies.  I refuse to use any sugar cookie recipe other than this one, so when this challenge came up, I knew I'd have a problem.  I still used my recipe, because I have never found another sugar cookie that melts in your mouth like that one does.  Using confectioner sugar as opposed to granulated is the key to a perfect sugar cookie. 

For this challenge, we were allowed to use any theme we'd like for our cookies, so long as it related to "September".  Mine is sort of September/October (Septober?) since I just did a basic fall leaf theme.   I made enough to share with several neighbors, as well!   Oh, and I had a great helper.... everyone must get one of these! 


Here is the basic sugar cookie recipe that was provided for this challenge, as well as the Royal Icing recipe.  (I did use the Royal Icing recipe, although I omitted the lemon juice and used Almond extract)


Basic Sugar Cookies:
Makes Approximately 36x 10cm / 4" Cookies
6 Tbsp Unsalted Butter, at room temperature
3 cups + 3 Tbsp All Purpose Flour
 1 cup Caster Sugar / Superfine Sugar
1 Large Egg, lightly beaten
1 tsp Vanilla Extract / Or seeds from 1 vanilla bean

Directions

• Cream together the butter, sugar and any flavourings you’re using. Beat until just becoming
creamy in texture.
• Tip: Don’t over mix otherwise you’ll incorporate too much air and the cookies will spread during
baking, losing their shape.

• Beat in the egg until well combined, make sure to scrape down the sides of the bowl.  Add the sifted flour and mix on low until a non sticky dough forms.

• Tip: I don’t have a stand mixer so I find it easier to switch to dough hooks at this stage to avoid flour flying everywhere.

• Knead into a ball and divide into 2 or 3 pieces.

• Roll out each portion between parchment paper to a thickness of about 5mm/1/5 inch (0.2 inch)

• Refrigerate for a minimum of 30mins.

• Tip: Recipes commonly just wrap the whole ball of dough in clingwrap and then refrigerate it for an
hour or overnight, but by rolling the dough between parchment, this shortens the chilling time and then it’s also been rolled out while still soft making it easier and quicker.

• Once chilled, peel off parchment and place dough on a lightly floured surface.

• Cut out shapes with cookie cutters or a sharp knife.

• Arrange shapes on parchment lined baking sheets and refrigerate for another 30mins to an hour.

• Tip: It’s very important you chill them again otherwise they’ll spread while baking.

• Re-roll scraps and follow the above process until all scraps are used up.

• Preheat oven to 180°C (160°C Fan Assisted) / 350°F / Gas Mark 4.

• Bake until golden around the edges, about 8-15mins depending on the size of the cookies.

• Tip: Bake same sized cookies together otherwise mixing smaller with larger cookies could result in some cookies being baked before others are done.


• Tip: Rotate baking sheets half way through baking if your oven bakes unevenly.

• Leave to cool on cooling racks.

• Once completely cooled, decorate as desired.


Royal Icing:


 2½ - 3 cups Powdered Sugar, unsifted
2 Large Egg Whites
2 tsp Lemon Juice
1 tsp Almond Extract, optional

Directions

• Beat egg whites with flavoring until combined.

• Tip: It’s important that the bowls/spoons/spatulas and beaters you use are thoroughly cleaned and
grease free.

• Sift the icing sugar to remove lumps and add it to the egg whites.

• Tip: I’ve listed 2 amounts of icing sugar, the lesser amount is good for a flooding consistency, and the larger amount is for outlining, but you can add even more for a much thicker consistency good for writing. If you add too much icing sugar or would like to make a thinner consistency, add very small amounts of water, a few drops at a time, until you reach the consistency you need.

• Beat on low until combined and smooth.

• Use immediately or keep in an airtight container.

• Tip: Royal Icing starts to harden as soon as it’s in contact with air so make sure to cover containers with plastic wrap while not in use.

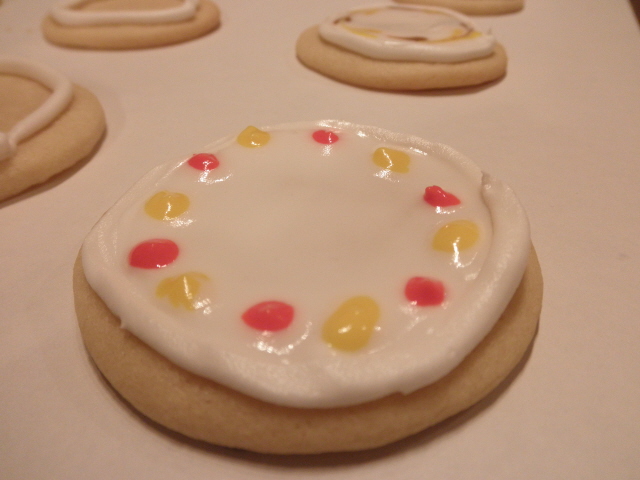
Decorating Your Cookies: Flooding


“Flooding” a cookie is a technique used when covering a cookie with Royal Icing.

1. You outline the area you want to flood which helps create a dam.

2. Then fill or flood inside the area you’ve outlined.

The most important thing when it comes to decorating with Royal Icing is the consistency.


There are two ways of flooding your cookies. Some like to do the outline with a thicker icing and then flood with a thinner icing. Some like to use the same icing to do both which saves time and you don’t have to have two different piping bags for each colour you’re using.


Use different colors to add polka-dots around the edge of a cookie

Drag a toothpick through the center of the polka-dots, without lifting up in between the dots.


The Same Consistency Method

• Mix your royal icing according to the recipe/instructions

• Drag a knife through the surface of the Royal Icing and count to 10

• If the surface becomes smooth between 5 & 10 seconds, the icing is at the correct consistency

• Tip: If your icing is too thick, thin it by adding a few drops of water. Mix, do the 10 second test, then if it’s still too thick, add a few more drops of water, repeat, etc.


• Tip: To thicken your icing, add small amounts of icing sugar until thick enough for the 10 second test.

Two Different Consistencies Method

• Mix your royal icing according to the recipe/instructions.

• Separate into 2 different bowls, one lot of icing for outlining, the other for flooding.

• For the outlining icing, drag a knife through the surface of the Royal Icing.

• If the surface becomes smooth at around 10 seconds, the icing is at the correct consistency.

• Tip: If your icing is too thick, thin it by adding a few drops of water. Mix, count to 10 seconds, then if it’s still too thick, add a few more drops of water, repeat, etc.


• Tip: To thicken your icing, add small amounts of icing sugar until thick enough for the 10 second test.

• For the flooding/filling icing, drag a knife through the surface of the Royal Icing.

• If the surface becomes smooth at around 3-4 seconds, the icing is at the correct consistency.

• Tip: If your icing is too thick, thin it by adding a few drops of water. Mix, count to 3-4 seconds, then if it’s still too thick, add a few more drops of water, repeat, etc.


• Tip: To thicken your icing, add small amounts of icing sugar until thick enough for the 3-4 second test.

Be sure to click on the Daring Bakers icon in my sidebar so you can select other Daring Bakers blogs and take a peek at their creations this month!

Friday, August 27, 2010

August Daring Bakers- Baked Alaska


The August 2010 Daring Bakers’ challenge was hosted by Elissa of 17 and Baking. For the first time, The Daring Bakers partnered with Sugar High Fridays for a co-event and Elissa was the gracious hostess of both. Using the theme of beurre noisette, or browned butter, Elissa chose to challenge Daring Bakers to make a pound cake to be used in either a Baked Alaska or in Ice Cream Petit Fours. The sources for Elissa’s challenge were Gourmet magazine and David Lebovitz’s “The Perfect Scoop”.

I love browned butter.  I've come to realize, you either love it or hate it.  I sang it's praises to my friend Angela as we sipped tea while I was making the browned butter for this challenge.  I really built up how fabulous browned butter was to her.... so much so, that it was a disappointment when I made her taste it straight from the spoon after I successfully browned the butter instead of burning the butter.  She hated it. 

I never thought we had much in common anyway.

I've had browned butter on pasta with Mizithra cheese (welcome to heaven), as well as browned butter atop freshly steamed broccoli florets.  I've had browned butter in the frosting for the caramel cake we made for the November 2008 DB Challenge.  Now I've had brown butter pound cake!  Tasty-- and simple to make!  I didn't think it was sweet enough, but the ice cream and sweet meringue added the sweetness I was craving after tasting the pound cake alone.

I chose to make the Baked Alaska, however, I got it in just under the wire.  We've had an egg recall here in my area and I wasn't sure I'd get the challenge done before the deadline!  I luckily found eggs at a county store that either
A.)  Did not use the supplier that was affected by the recall.
B.)  Used the eggs from the supplier that was affected and didn't care.
C.)  Was so far in the sticks that they don't have electricity and don't know about the recall.

Either way, I"m happy to have a finished product in time!  Enjoy!

**Baked Alaska Recipe**


3 components needed:

*Brown  Butter Pound Cake
*Ice cream (homemade or purchased)
*Meringue


Brown Butter Pound Cake

19 tablespoons  unsalted (sweet) butter
2 cups  sifted cake flour (not self-rising; sift before measuring)
1 teaspoon baking powder
1/2 teaspoon salt
1/2 cup packed light brown sugar
1/3 cup granulated sugar
4 large eggs
1/2 teaspoon pure vanilla extract

1. Preheat the oven to 325°F/160°C and put a rack in the center. Butter and flour a 9”x9” (23cmx23cm) square pan.

2. Place the butter in a 10” (25cm) skillet over medium heat. Brown the butter until the milk solids are a dark chocolate brown and the butter smells nutty. (Don’t take your eyes off the butter in case it burns.) Pour into a shallow bowl and chill in the freezer until just congealed, 15-30 minutes.

3. Whisk together cake flour, baking powder, and salt.

4. Beat the brown butter, light brown sugar, and granulated sugar in an electric mixer until light and fluffy, about 2 minutes. Beat in the eggs one at a time, mixing well, and then the vanilla extract.

5. Stir in the flour mixture at low speed until just combined.

6. Scrape the batter into the greased and floured 9”x9” (23cmx23cm) square pan. Smooth the top with a rubber spatula and rap the pan on the counter. Bake until golden brown on top and when a toothpick inserted into the center comes out clean, about 25 minutes.

7. Cool in the pan 10 minutes. Run a knife along the edge and invert right-side-up onto a cooling rack to cool completely.

Meringue
Ingredients:
8 large egg whites
½ teaspoon cream of tartar
½ teaspoon salt
1 cup  sugar

Directions:
Beat the egg whites, cream of tartar, and salt on high speed in an electric mixer until soft peaks form. Beat in the sugar gradually in a slow stream until stiff peaks form.


Assembly Instructions

1. Line four 4” diameter tea cups with plastic wrap, so that plastic wrap covers all the sides and hangs over the edge. Fill to the top with ice cream. Cover the top with the overhanging plastic wrap and freeze for several hours, or until solid.

2. Level the top of the brown butter pound cake with a serrated knife or with a cake leveler. Cut out four 4”  diameter circles from the cake. Discard the scraps or use for another purpose.


3. Make the meringue (see above.)

4. Unwrap the ice cream “cups” and invert on top of a cake round. Trim any extra cake if necessary.


5. Pipe the meringue over the ice cream and cake, or smooth it over with a spatula, so that none of the ice cream or cake is exposed. Freeze for one hour or up to a day.


6. Burn the tips of the meringue with a cooking blow torch. Or, bake the meringue-topped Baked Alaskas on a rimmed baking sheet in a 500°F/260°C oven for 5 minutes until lightly golden. Serve immediately.


Why does mine look like a bunch of penguins trying to get out of something?

Wednesday, July 28, 2010

Washboard Cookies


These cookies are made from staples in your pantry, making them quick and easy.  I yielded 2 dozen cookies from this recipe.   I only had light brown sugar on hand so I turned it into dark brown sugar by adding 1 tbsp of molasses per 1 cup of light brown sugar and blending.  If you only have white granulated sugar, you can make it dark brown by adding 2 tbsp of molasses to 1 cup of granulated sugar and blending. 
 
Ingredients 

1/2 cup butter, softened
1 cup packed dark brown sugar
1 egg
1/2 teaspoon baking soda
1 tablespoon hot water
1 teaspoon vanilla extract
1 3/4 cups all-purpose flour sugar

Directions 
  1. In a mixing bowl, cream butter, brown sugar and egg. Stir together baking soda, water and vanilla; add to creamed mixture. Add flour and mix well.
  2. Shape into walnut-sized balls. Place on greased baking sheets; flatten with a fork that has been dipped in water. Sprinkle with sugar.
  3. Bake at 325 degrees F for 15-20 minutes or until edges begin to brown. Cool on waxed paper.

Tuesday, July 27, 2010

July Daring Bakers- Swiss Swirl Ice Cream Cake

The July 2010 Daring Bakers’ challenge was hosted by Sunita of Sunita’s world – life and food. Sunita challenged everyone to make an ice-cream filled Swiss roll that’s then used to make a bombe with hot fudge. Her recipe is based on an ice cream cake recipe from Taste of Home.

Let me just start by saying that I heart Taste of Home. I am a subscriber to their magazine and am on their website at least twice a week, browsing recipes. Most of their recipes are right up my alley-- easy, inexpensive and tasty.

This month's challenge was no exception.

It was easy. Sunita made it more challenging for us by requiring us to make our Swiss cake roll instead of buying Little Debbie's and she also required us to make our own ice cream (2 flavors to boot!) as well as the hot fudge.

In a pinch, you could make this show-stopping cake by using store-bought ice cream and jarred hot fudge; but please don't skip out on making the Swiss cake roll. There is no comparison to homemade and it literally takes minutes to make. Little Debbie had to make hers from scratch at some point, too, you know.

Be sure to click over on the link for the Daring Bakers in the sidebar- that will bring you to the blogroll which will allow you to browse other Daring Bakers creations!

Follow the recipes included and you'll end up with a bombe that is da'bomb! (oh yes I did just say that.)


The Swiss rolls
Preparation time- 10 minutes
Baking time- 10-12 minutes
Rolling and cooling time- at least 30 minutes
Filling-5-8 minutes
Filling and rolling- 5-10 minutes

Ingredients

6 medium sized eggs
1 cup caster sugar + extra for rolling (I just used granulated)
6 tbsp of all purpose flour + 5 tbsp of natural unsweetened cocoa powder, sifted together
2 tbsp of boiling water
a little oil for brushing the pans

For the filling-
2 cups of whipping cream
1 vanilla pod, cut into small pieces of about ½ cm  or 1 tsp vanilla extract
5 tbsp of caster sugar (again, granulated)

Method-
  1. Pre heat the oven at 400 deg F
  2. Brush the baking pans ( 11 inches by 9 inches ) with a little oil and line with greaseproof baking paper. If you have just one pan, bake one cake and then let the pan cool completely before using it for the next cake.
  3. In a large mixing bowl, add the eggs and sugar and beat till very thick; when the beaters are lifted, it should leave a trail on the surface for at least 10 seconds.
  4. Add the flour mixture, in three batches and fold in gently with a spatula. Fold in the water.
  5. Divide the mixture among the two baking pans and spread it out evenly, into the corners of the pans.
  6. Place a pan in the centre of the pre heated oven and bake for about 10-12 minutes or till the centre is springy to the touch.
  7. Spread a kitchen towel on the counter and sprinkle a little caster sugar over it. Turn the cake on to the towel and peel away the baking paper. Trim any crisp edges.
  8. Starting from one of the shorter sides, start to make a roll with the towel going inside. Cool the wrapped roll on a rack, seam side down.
  9. Repeat the same for the next cake as well. Grind together the vanilla pieces and sugar in a food processer till nicely mixed together. If you are using vanilla extract, just grind the sugar on its own and then add the sugar and extract to the cream. 
  10. In a large bowl, add the cream and vanilla-sugar mixture and beat till very thick. Divide the cream mixture between the completely cooled cakes. Open the rolls and spread the cream mixture, making sure it does not go right to the edges (a border of ½ an inch should be fine). 
  11. Roll the cakes up again, this time without the towel. Wrap in plastic wrap and chill in the fridge till needed, seam side down.


Vanilla Ice Cream-
Preparation time-5 minutes+freezing

Ingredients-
2 and  1/2 cup whipping cream
1 vanilla bean, minced or 1 tsp vanilla extract
1/2 cup granulated sugar
Method- 
  1. Grind together the sugar and vanilla in a food processor. In a mixing bowl, add the cream and vanilla –sugar mixture and whisk lightly till everything is mixed together. If you are using the vanilla extract, grind the sugar on its own and then and the sugar along with the vanilla extract to the cream.
  2. Pour into a freezer friendly container and freeze till firm around the edges. Remove from the freezer, beat till smooth and return to the freezer. Do this 3-4 times and then set completely.

Hot fudge sauce- make this just after adding the layer of vanilla ice cream to the cake
Preparation time-2 minutes
Cooking time-2 minutes

Ingredients
1 cup caster/granulated sugar
3 tbsp natural unsweetened cocoa powder
2 tbsp cornstarch
1 and 1/2 cups water
1 tbsp butter
1 tsp vanilla extract

Method
In a small saucepan, whisk together the sugar, cocoa powder, cornstarch and water

Place the pan over heat, and stir constantly, till it begins to thicken and is smooth (for about 2 minutes). Remove from heat and mix in the butter and vanilla. Keep aside to cool.

Chocolate Ice Cream-

Preparation time- 5 minutes + freezing
Ingredients

2 cups whipping cream
1 cup caster sugar
3 tbsp of natural unsweetened cocoa powder
Method-
  1. Grind together the sugar and the cocoa powder in a food processor .
  2. In a saucepan, add all the ingredients and whisk lightly.
  3. Place the pan over heat and keep stirring till it begins to bubble around the edges.
  4. Remove from heat and cool completely before transferring to a freezer friendly container till firm around the edges. If you are using an ice cream maker, churn the ice cream according to the manufacturer’s instruction, after the mixture has cooled completely.
  5. Remove from the freezer, beat till smooth and return to the freezer. Do this 3-4 times and then set completely.

     
Assembly-
1. Cut the Swiss rolls into 20 equal slices ( approximately 2 cms each ).

2. Cover the bottom and sides of the bowl in which you are going to set the dessert with cling film/plastic wrap


3. Arrange two slices at the bottom of the pan, with their seam sides facing each other. Arrange the Swiss roll slices up the bowl, with the seam sides facing away from the bottom, to cover the sides of the bowl. Cover the bowl with plastic wrap and freeze till the slices are firm (at least 30 minutes).


4. Soften the vanilla ice cream. Take the bowl out of the freezer, remove the cling film cover and add the ice cream on top of the cake slices. Spread it out to cover the bottom and sides of the bowl. Cover the bowl with plastic wrap and freeze till firm ( at least 1 hour)


5. Add the fudge sauce over the vanilla ice cream, cover and freeze till firm. (at least an hour)

6. Soften the chocolate ice cream and spread it over the fudge sauce. Cover with plastic wrap and freeze for at least 4-5 hours till completely set .


7. Remove the plastic cover, and place the serving plate on top of the bowl. Turn it upside down and remove the bowl and the plastic lining. If the bowl does not come away easily, wipe the outsides of the bowl with a kitchen towel dampened with hot water. The bowl will come away easily.


8. Keep the cake out of the freezer for at least 10 minutes before slicing, depending on how hot your region is. Slice with a sharp knife, dipped in hot water.