Showing posts with label Bars. Show all posts

Monday, May 31, 2010

Cream Cheese Bars


This is a recipe that was given to me by a neighbor. They are so easy to make but you would never guess that by the taste! I usually wouldn't even try a bar that was made with crescent rolls, however, I tried these and loved them even before knowing that there were crescent rolls in them!

Ingredients:

2 - Tubes Original Crescent Rolls
2 - 8 oz. Boxes Cream Cheese
1 Cup Sugar (divided)
1 tsp. Vanilla Extract
1 tsp. Almond Extract
1 Egg

Directions:

Preheat oven to 375 degrees.

Mix cream cheese, vanilla, almond, 3/4 cup sugar and egg yolk. Beat with mixer until creamy. Spray 9x13 pan with nonstick spray. Spread 1 tube
crescent roll evenly over bottom of pan, sealing seams with fingers. Spread mixture evenly over crescent.

Cover mixture with second tube of crescent rolls, again spreading evenly & sealing seems. Beat egg white with fork until frothy, spread evenly over top. Sprinkle remaining 1/4 cup sugar on top layer.

Bake 20 minutes.

Refrigerate at least 4 hours before serving.

Tuesday, February 2, 2010

Bounty Bars- Coconut Chocolates


Just in time for Valentine's Day! How pretty are these coconut candies? They taste like a Mounds Bar or an Almond Joy, minus the joy of the almond! They are extremely sweet, so I cut them to be bite-sized. I'm sure you could cut them into more of a candy-bar size if you really want the full effect of a candy bar.

Ingredients:

1/2 cup heavy cream
1 1/2 cups sugar
2 sticks plus 2 tablespoons butter (18 tablespoons)
3 cups shredded coconut
4 oz dark chocolate (I actually used semi-sweet)
2 Tbsp oil

Directions:

Dice butter; put cream, sugar and butter in a medium saucepan and heat until it boils, stirring almost constantly. Boil for another 5 minutes, while stirring constantly with a wooden spoon.

Remove from heat and stir in coconut.

Line an 8x8 baking pan with waxed paper and pour the mixture into pan. Cover pan with plastic wrap and refrigerate overnight.

The next day, turn it out onto a cutting board and remove the paper.

Cut it into cubes or into shape of a rectangular cuboid (which is the original shape of a Bounty candy bar).


Combine chocolate and oil in the top portion of a double boiler. Heat until melted. Dip each coconut cube in the melted chocolate to coat.

Allow to dry on waxed paper. I put it in the fridge to speed up the process.

Serve at room temperature (or cold.... whatever!).

Wednesday, January 27, 2010

January Daring Bakers-- Nanaimo Bars


Where has the month gone? I will be finished with school in December, and when I say that the time felt like it was creeping slowly up until graduation, remind me of how often these Daring Baker Challenges came up and remind me of how little I posted to this blog in between challenges! Wow-- not a single post since last month's challenge. I'm pathetic.

The January 2010 Daring Bakers’ challenge was hosted by Lauren of Celiac Teen. Lauren chose Gluten-Free Graham Wafers and Nanaimo Bars as the challenge for the month. The sources she based her recipe on are 101 Cookbooks and www.nanaimo.ca.

This month's challenge is in honor of the 2010 Winter Olympics being held in Vancouver, British Columbia. Nanaimo Bars (pronounced Nah-nye-Moh) are a classic Canadian dessert created in none other than Nanaimo, British Colombia. These bars have 3 layers: a base containing graham crackers, cocoa, coconut and nuts, a middle custard layer, and a topping of chocolate.


Now, going into this challenge, I knew I wouldn't like the results. I don't like graham crackers and I've only once ever made Nanaimo bars and I didn't like them either. I was hoping to be pleasantly surprised with the results, but unfortuntely, I still don't like either of them! But I'd say that was a successful challenge, woudln't you? If I ended up liking something I didn't like previously, then that would mean that I made them wrong! So I must have reached success this month!

However, even though I don't like the taste of either of the recipes, I must say they both turned out rather striking!

Oh, and I didn't make my recipe to be gluten-free. I already knew I wouldn't like the results and I didn't want to spend the extra on ingredients that I'd probably never use again, so I went ahead and used regular ingredients. If you'd like the recipe for gluten-free, check out the other Daring Bakers creations!


Graham Cracker Recipe

2 1/2 cups plus 2 tablespoons unbleached pastry flour or unbleached all-purpose flour
1 cup dark brown sugar, lightly packed
1 teaspoon baking soda
3/4 teaspoon kosher salt
7 tablespoons unsalted butter, cut into 1-inch cubes and frozen
1/3 cup mild-flavored honey, such as clover
5 tablespoons whole milk
2 tablespoons pure vanilla extract

For the topping:

3 tablespoons granulated sugar
1 teaspoon ground cinnamon

In the bowl of a food processor fitted with the steel blade or in the bowl of an electric mixer fitted with the paddle attachment, combine the flour, brown sugar, baking soda, and salt. Pulse or mix on low to incorporate. Add the butter and pulse on and off on and off, or mix on low, until the mixture is the consistency of a coarse meal.


In a small bowl, whisk together the honey, milk, and vanilla extract. Add to the flour mixture and pulse on and off a few times or mix on low until the dough barely comes together. It will be very soft and sticky.

Turn the dough out onto a lightly floured work surface and pat the dough into a rectangle about 1 inch thick. Wrap in plastic and chill until firm, about 2 hours or overnight.

To prepare the topping: In a small bowl, combine the sugar and cinnamon, and set aside.

Divide the dough in half and return one half to the refrigerator. Sift an even layer of flour onto the work surface and roll the dough into a long rectangle about 1/8 inch thick. The dough will be sticky, so flour as necessary. Trim the edges of the rectangle to 4 inches wide.

Working with the shorter side of the rectangle parallel to the work surface, cut the strip every 4 1/2 inches to make 4 crackers. Gather the scraps together and set aside. Place the crackers on one or two parchment-lined baking sheets and sprinkle with the topping. Chill until firm, about 30 to 45 minutes. Repeat with the second batch of dough.


Adjust the oven rack to the upper and lower positions and preheat the oven to 350 degrees.

Gather the scraps together into a ball, chill until firm, and reroll. Dust the surface with more flour and roll out the dough to get about two or three more crackers.

Mark a vertical line down the middle of each cracker, being careful not to cut through the dough. Using a toothpick or skewer, prick the dough to form two dotted rows about 1/2 inch for each side of the dividing line.


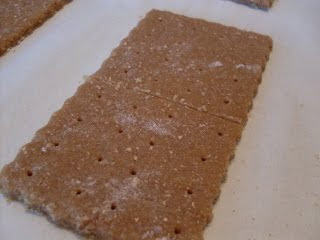
Bake for 25 minutes, until browned and slightly firm to the tough, rotating the sheets halfway through to ensure even baking.

mine were a little too thick, but still tasted nasty like a graham cracker.


Nanaimo Bars

-Bottom Layer-
1/2 cup Unsalted Butter
1/4 cup Granulated Sugar
5 tablespoons Unsweetened Cocoa
1 Large Egg, Beaten
1 1/4 cups Graham Wafer Crumbs
1/2 cup Almonds, Finely chopped
1 cup Coconut (Shredded, sweetened or unsweetened)

-Middle Layer-
1/2 cup Unsalted Butter
2 tablespoons and 2 teaspoons Heavy Cream
2 tablespoons Vanilla Custard Powder -Vanilla pudding mix may be substituted
2 cups Icing Sugar

-Top Layer-
4 ounces Semi-sweet chocolate
2 tablespoons Unsalted Butter

Directions:
1. For bottom Layer: Melt unsalted butter, sugar and cocoa in top of a double boiler. Add egg and stir to cook and thicken. Remove from heat. Stir in crumbs, nuts and coconut. Press firmly into an ungreased 8 by 8 inch pan.


2. For Middle Layer: Cream butter, cream, custard powder, and icing sugar together well. Beat until light in colour. Spread over bottom layer.


3. For Top Layer: Melt chocolate and unsalted butter over low heat. Cool. Once cool, pour over middle layer and chill.

Friday, October 2, 2009

Fall and Halloween Ideas- take 2

Because I feel like I'll never get a chance to make anything fun again and because I don't have the time to blog about anything fun that I do get a chance to do, I thought I'd repost some of the Fall/Halloween stuff I did last year. I have some blog followers that are new this year, so perhaps these ideas won't be repeats for them! Just click on the title of the photo and it will bring you to the original posting.

Candy Corn Clay Pot


Pumpkin Jar Candle


Salty Bones Breadsticks


Crispy Ghosts


Spirit Jugs


Pop Up Pumpkin Card


Witches Hats


Mummy Dogs


Pumpkin Bars with Cream Cheese Frosting


Decorative Plates


Fall Centerpiece


Fall Placemats


Fall Sun Catchers


Pumpkin Cookies


Candleyebra


Pumpkin Bread

Wednesday, May 27, 2009

May Daring Bakers-- Apple Strudel


The May Daring Bakers’ challenge was hosted by Linda of make life sweeter! and Courtney of Coco Cooks. They chose Apple Strudel from the recipe book Kaffeehaus: Exquisite Desserts from the Classic Cafés of Vienna, Budapest and Prague by Rick Rodgers.

I loved this month's challenge! I not only loved making it (it truly was a breeze), but I loved eating it, too! I can't figure out why I loved it-- I don't even like apples! But I couldn't not try the finished product. What a surprise! I skipped the raisins and the rum since I also don't like raisins (seriously, have you ever met anyone pickier?). The texture was amazing. The pastry was amazing. The sweetness mixed with the tartness of the Granny Smith apples was amazing. The golden color was amazing. The entire thing was amazing!

I didn't have a single problem with this recipe. I loved the ease of the dough (mine sat for longer than 90 minutes... I got sidetracked!) and I improvised by using a sheet instead of a table cloth. I didn't use Gloria (aka, my Kitchen Aid mixer) and instead just kneaded by hand. It was a simple dough to knead; no tired muscles! I was amazed at how thin that dough was able to go without tearing. I loved the surprise of the toasted breadcrumbs in the strudel. I'm not sure what their purpose was, but it added a nice texture with the flaky pastry. (LOVED the pastry-- I can hardly wait to make it again!). I didn't shape mine into a horseshoe shape because that reminded me of a Kielbasa or Ring Bologna or something! So I went with a plain old, boring loaf shape.

I'll have to try another flavor next time. Rhubarb? Cherry? Strawberry? Cinnamon? The only thing missing was some yummy whipped cream or vanilla ice cream to go along with the strudel. Or even a piece of cheddar cheese! (Is my family the only family that grew up eating a big chunk of cheese on their apple pie? It is quite weird, now that I think about it...)

Here is the fabulous recipe:

Preparation time:

Total: 2 hours 15 minutes – 3 hours 30 minutes
15-20 min to make dough
30-90 min to let dough rest/to prepare the filling
20-30 min to roll out and stretch dough
10 min to fill and roll dough
30 min to bake
30 min to cool

Apple Strudel

from “Kaffeehaus – Exquisite Desserts from the Classic Cafés of Vienna, Budapest and Prague” by Rick Rodgers


Ingredients:

2 tablespoons golden rum
3 tablespoons raisins
1/4 teaspoon ground cinnamon
1/3 cup plus 1 tablespoon sugar
1/2 cup unsalted butter, melted, divided
1 1/2 cups fresh bread crumbs
strudel dough (recipe below)
1/2 cup coarsely chopped walnuts
2 pounds tart cooking apples, peeled, cored and cut into 1/4 inch-thick slices (use apples that hold their shape during baking)

Directions:

1. Mix the rum and raisins in a bowl. Mix the cinnamon and sugar in another bowl.

2. Heat 3 tablespoons of the butter in a large skillet over medium-high. Add the breadcrumbs and cook whilst stirring until golden and toasted. This will take about 3 minutes. Let it cool completely.

3. Put the rack in the upper third of the oven and preheat the oven to 400°F. Line a large baking sheet with baking paper (parchment paper). Make the strudel dough as described below. Spread about 3 tablespoons of the remaining melted butter over the dough using your hands (a bristle brush could tear the dough, you could use a special feather pastry brush instead of your hands). Sprinkle the buttered dough with the bread crumbs. Spread the walnuts about 3 inches from the short edge of the dough in a 6-inch wide strip. Mix the apples with the raisins (including the rum), and the cinnamon sugar. Spread the mixture over the walnuts.

4. Fold the short end of the dough onto the filling. Lift the tablecloth at the short end of the dough so that the strudel rolls onto itself. Transfer the strudel to the prepared baking sheet by lifting it. Curve it into a horseshoe to fit. Tuck the ends under the strudel. Brush the top with the remaining melted butter.

5. Bake the strudel for about 30 minutes or until it is deep golden brown. Cool for at least 30 minutes before slicing. Use a serrated knife and serve either warm or at room temperature. It is best on the day it is baked.


Strudel dough

from “Kaffeehaus – Exquisite Desserts from the Classic Cafés of Vienna, Budapest and Prague” by Rick Rodgers


Ingredients:

1 1/3 cups unbleached flour
1/8 teaspoon salt
7 tablespoons water, plus more if needed
2 tablespoons vegetable oil, plus additional for coating the dough
1/2 teaspoon cider vinegar

Directions:

1. Combine the flour and salt in a stand-mixer fitted with the paddle attachment. Mix the water, oil and vinegar in a measuring cup. Add the water/oil mixture to the flour with the mixer on low speed. You will get a soft dough. Make sure it is not too dry, add a little more water if necessary.

Take the dough out of the mixer. Change to the dough hook. Put the dough ball back in the mixer. Let the dough knead on medium until you get a soft dough ball with a somewhat rough surface.

2. Take the dough out of the mixer and continue kneading by hand on an unfloured work surface. Knead for about 2 minutes. Pick up the dough and throw it down hard onto your working surface occasionally.

Shape the dough into a ball and transfer it to a plate. Oil the top of the dough ball lightly. Cover the ball tightly with plastic wrap. Allow to stand for 30-90 minutes (longer is better).

3. It would be best if you have a work area that you can walk around on all sides like a 36 inch round table or a work surface of 23 x 38 inches. Cover your working area with table cloth, dust it with flour and rub it into the fabric. Put your dough ball in the middle and roll it out as much as you can.

Pick the dough up by holding it by an edge. This way the weight of the dough and gravity can help stretching it as it hangs. Using the back of your hands to gently stretch and pull the dough. You can use your forearms to support it.

4. The dough will become too large to hold. Put it on your work surface. Leave the thicker edge of the dough to hang over the edge of the table. Place your hands underneath the dough and stretch and pull the dough thinner using the backs of your hands. Stretch and pull the dough until it's about 2 feet wide and 3 feet long, it will be tissue-thin by this time. Cut away the thick dough around the edges with scissors. The dough is now ready to be filled.

Be sure to check out The Daring Bakers Blogroll to see creations by other members!

Saturday, March 14, 2009

Black and White Cheescake Squares


This recipe is from Martha Stewart- it's very rich and tasty and the edge pieces are to die for!

Makes 24

Ingredients:

Vegetable oil cooking spray
2 cups plus 2 tablespoons all-purpose flour
3/4 cup unsweetened Dutch-process cocoa powder
1 teaspoon baking soda
1/2 teaspoon salt
10 ounces (2 1/2 sticks) unsalted butter, softened
2 cups granulated sugar
3 large eggs
21/2 teaspoons pure vanilla extract
8 ounces cream cheese, softened
1/2 cup confectioners' sugar

Directions:

Preheat oven to 325 degrees. Coat a 9-by-13-inch baking dish with cooking spray. Line dish with parchment, leaving a 2-inch overhang on both long sides, then spray parchment.

Sift flour, cocoa powder, baking soda, and salt into a large bowl. Cream butter and granulated sugar with a mixer until smooth. Add 2 eggs and 2 teaspoons vanilla, and beat until smooth, scraping down sides of bowl. Reduce speed to low; add flour mixture. Increase speed to medium; beat until incorporated.

Reserve 1 cup of dough; cover, and refrigerate. Press remaining dough into bottom of prepared dish. Refrigerate for 30 minutes. Bake until base is set and edges are puffed, about 25 minutes. Let cool in dish on a wire rack.

Mix cream cheese, confectioners' sugar, and remaining egg and 1/2 teaspoon vanilla in a medium bowl. Spread over cooled base; crumble reserved dough on top. Bake until filling is set, 25 to 30 minutes. Let cool in dish on wire rack, then lift out using overhang. Cut into 24 squares. Squares will keep, covered and refrigerated, for up to 3 days.

Sunday, January 25, 2009

Frosted Banana Bars

This is another recipe my mom has become famous for. These bars are made for gatherings and potlucks and never last long. And, as an added bonus, the ingredients are staples in most kitchens so you won't need to run to the store to gather ingredients before making them.

Ingredients:

1 1/2 cups flour
1 cup sugar
1/2 tsp soda
1/2 tsp salt
1/2 cup shortening
2 eggs
1/3 cup milk*
1 tsp lemon juice*
1/2 chopped nuts (optional)
1 1/2 very ripe, medium sized bananas; sliced (the other half of the second banana will be used in the frosting, posted below)

*(1/3 cup sour milk may be substituted for these two ingredients)

Directions:

Combine all ingredients in a mixing bowl. Beat at medium speed for 2 minutes. Spread into a greased 9x13" pan. Bake at 350° for 25-30 minutes.

Cool and frost with banana frosting; recipe as follows. Sprinkle with nuts, if desired.

Banana Frosting:

Ingredients:

2 tbsp butter, softened
2 cups powdered sugar
1/4 tsp salt
1 tsp vanilla
1/2 medium ripe banana, sliced

Directions:

Combine all ingredients in a bowl and beat until smooth and creamy. If necessary, thin with a few drops of milk, or thicken with a bit more powdered sugar.

Saturday, January 10, 2009

Malted Mocha Bars


Heaven. I've had this recipe stashed away for months and knew it would be delicious! Everytime I went to the grocery store, I would forget to pick up instant coffee and malted milk powder, so I had to hold off on making these. But I finally remembered... and boy, was it worth the wait!


Ingredients:

2/3 cup butter, softened
2/3 cup packed brown sugar
1-1/4 cups all-purpose flour
Nonstick cooking spray
3 eggs, beaten
1/3 cup granulated sugar
4 teaspoons vanilla
1-1/2 cups flaked coconut
3/4 cup chocolate malted milk powder
1/4 cup all-purpose flour
2 teaspoons instant espresso powder or instant coffee crystals
1/4 teaspoon baking powder
1/4 teaspoon salt
1-1/2 cups sifted powdered sugar
3 tablespoons chocolate malted milk powder
1 tablespoon boiling water

Directions:

Preheat oven to 350 degrees F. In a mixing bowl stir together butter, brown sugar, and the 1-1/4 cups flour until smooth. If necessary, gently knead to blend. Coat a 13x9x2-inch baking pan with nonstick cooking spray; pat flour mixture into the bottom of pan. Bake for 15 minutes or until just set.

Meanwhile, beat together eggs, granulated sugar, and 2 teaspoons of the vanilla. Stir in coconut, the 3/4 cup malted milk powder, the 1/4 cup flour, 1-1/2 teaspoons of the espresso powder or coffee crystals, baking powder, and salt. Carefully spread mixture on top of baked layer. Bake 20 to 25 minutes more or until set. Cool on a wire rack.

In a medium bowl beat together powdered sugar, the 3 tablespoons malted milk powder, the remaining 2 teaspoons vanilla, the remaining 1/2 teaspoon espresso powder or coffee crystals, and boiling water. If necessary, beat in a little additional boiling water until icing is of spreading consistency. Spread over cooled bars. Makes 36 bars.

Thursday, October 30, 2008

Brains For Dinner!


For Halloween dinner, I usually try to come up with something quick and fast, but still gruesome and fun.

Try serving spaghetti from a skull Halloween bucket, along with some chicken fingers with the tips dipped in paprika (to make fingernails) to gross out the family but still get something hearty in their bellies before heading out trick-or-treating!

Thursday, October 16, 2008

Pumpkin Bars with Cream Cheese Frosting


My friend Angela and I have started doing "Baking Days" where we get together and bake yummy things and drink yummy warm coffee (or tea!) and have yummy conversation. We then split up our treats and go on our merry ways.

The last two times we've done this (okay, the only two times we've done this), Angela has made these wonderful pumpkin bars. I have a feeling that she may make them every time we have a Baking Day... and there will be no complaints from me! I added the little candy corns faces on top. I saw pumpkin bars similarly decorated on the Taste of Home website and thought it was cute!

*Tip* These bars taste amazing refrigerated!

Ingredients:

(Look at the fall colors out my window! Perfect pumpkin baking weather!)


2 cups all purpose flour
1 tsp ground cinnamon
1 tsp baking soda
1/2 tsp salt
2 cups granulated sugar
3 large eggs, beaten
1 cup vegetable oil
1 cup canned pumpkin
1 cup walnuts, chopped (optional)
Cream Cheese Frosting (recipe follows)

Directions:

1. Combine flour, cinnamon, baking soda, salt and sugar.

2. Stir in beaten eggs, oil and canned pumpkin until thoroughly combined. Stir in chopped walnuts.

3. Spread batter into an ungreased 15x10x1 baking pan.

4. Bake at 325°F for 30 minutes.


5. Cool and frost with Cream Cheese Frosting, if desired. Cut into bars. Keep refrigerated

Cream Cheese Frosting


6 oz cream cheese, softened
3 cups powdered sugar
6 tbsp butter, softened
1 tsp vanilla extract

1. Combine frosting ingredients in a small bowl; mix until well blended. Spread onto bars before cutting.


(To give the pumpkin bars a Halloween face, I just used candy corn and a little bit of chocolate chips melted with a splash of milk.)

Wednesday, September 17, 2008

Homemade Peanut Butter Cups

My friend Bean shared this recipe the other day. It is a vegan recipe, but like her, I made mine with regular ol' ingredients. They are so good.... and very rich. Your dentist will hate me for posting this recipe (or, he may love me for posting this recipe.... job security!)


Ingredients:


1 cup creamy peanut butter
1/2 cup powdered sugar
1 bag of milk chocolate chips
1/4 teaspoon salt
mini muffin cups

Directions:

Fill a mini-muffin pan with the muffin liners.

Microwave the half of chocolate chips for about 1 minute at in a glass or microwaveable bowl.

Stir until creamy; you might need to microwave them a little more. Make sure you do not overcook them.

Using a spoon or paint brush spread the chocolate evenly within the muffin cups making sure you fill the crevices on the sides.


Place the coated muffin cups in the freezer so that the chocolate hardens (about 10 minutes)

In a separate bowl combine the peanut butter and salt and fold in the powdered sugar.

When the chocolate cups have hardened put the peanut butter mixture into the microwave for 30-45 seconds. This will soften the peanut butter mixture, making it easier to work with.

Spoon the peanut butter into the chocolate cups leaving a little room for the top layer of chocolate.


Place the cups in the freezer for about 10 minutes to allow the peanut butter to harden.

Just before removing the peanut butter cups from the freezer, melt the remaining chocolate chips as you did for the first layer.

Remove cups from freezer and spread with another layer of melted chocolate.

Place in freezer to set.

You can either serve these frozen or keep them in the refrigerator or keep at room temperature to serve. I personally like them frozen!

Makes 24 mini Peanut Butter Cups or 12 large Peanut Butter Cups